
Projects:
GTO
My
67 Pontiac GTO
Trunk Body Work
-Trunk pans
-Wheel wells
Body Work Part 1
-Rear Quarters
-Rear Door Jambs
-Window Reveals
Body Work Part 2
-Cowl
-Pillar
-Rocker
Body Work Part 3
-Windshield channel
-Doors
-Fenders
GTO Paint
-Filler work
-Priming
-Blocking
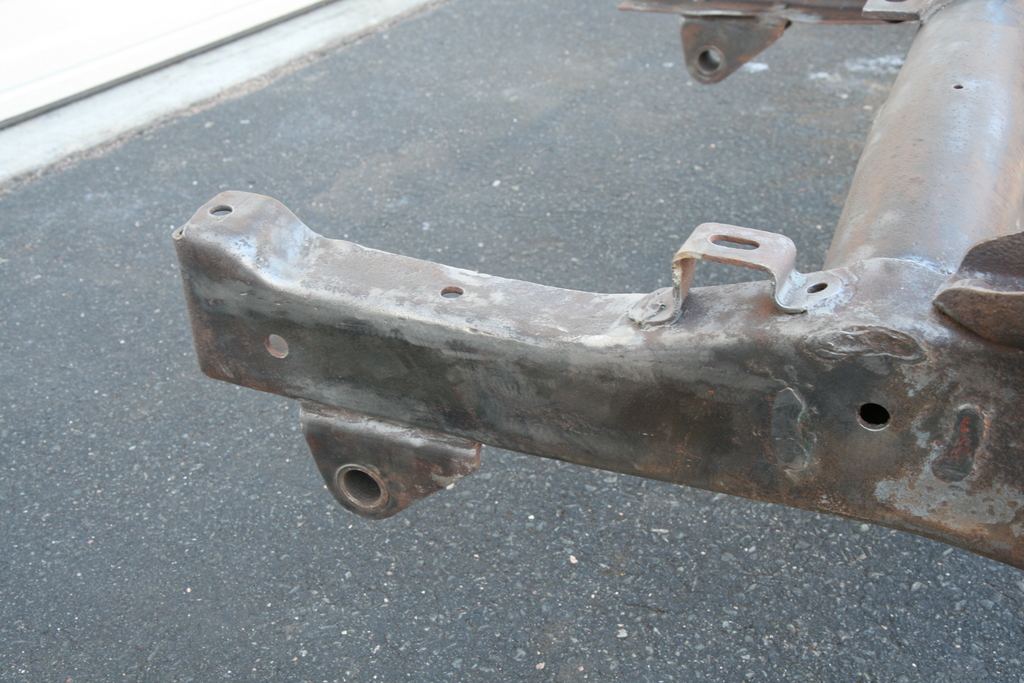
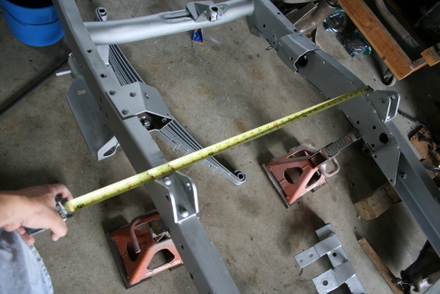
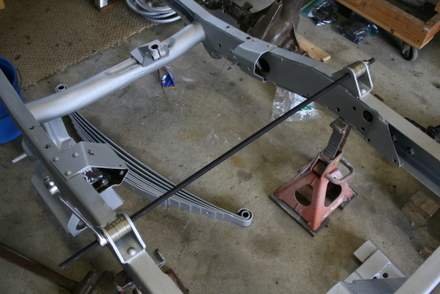
GTO Frame Work
GTO Convertible Top Pt 1
-Top Frame
GTO Convertible Top Pt 2
-Top Trim
GTO Drivetrain
-Engine
-Quadrajet Rebuild
-Exhaust
-Axle
Muncie
Rebuild
popular
Auto to Manual Swap
1967
Ram Air GTO
story
Wheelhouse Filler template PDF
Willys CJ3A
CJ3A Intro
Engine and REBUILD
Drivetrain
BodyWork 1
BodyWork 2
BodyWork 3
BodyWork 4
Paintwork 1
Paintwork 2
Final Assembly
Final Assembly 2
Electrical System
Other Rods
TJ Wrangler Rubicon
CJ7
CJ8
Decrepid Dakota
Powerdyne Minibike
Allis Chalmers B engine rebuild Part 1
Allis Chalmers B engine rebuild Part 2
Allis Chalmers Generator to Alternator conversion
Gizmos
Stereo camera
rig
Stereo mic preamp
About:

Feeds

Markup
CJ3A Chassis and Drivetrain Rebuild
A page featuring the rebuild and
refurbishment of the frame and drivetrain of a 1950 CJ3A. Scoll down for latest updates.
August 30, 2016
After achieving success with the test firings of the Go Devil powerplant, the time had come to initiate "Phase II" of the CJ project: The Chassis Rebuild. This phase entails finally dragging the Jeep from out back and rebuilding the frame, suspension and drivetrain so that the working engine can be set in place.
The Jeep had sat long enough to sink in a bit, so I jacked it out of the muck and began tearing the front end and top off. Recent photos of the CJ3A have been withheld due to the shocking nature of its condition so brace yourself:
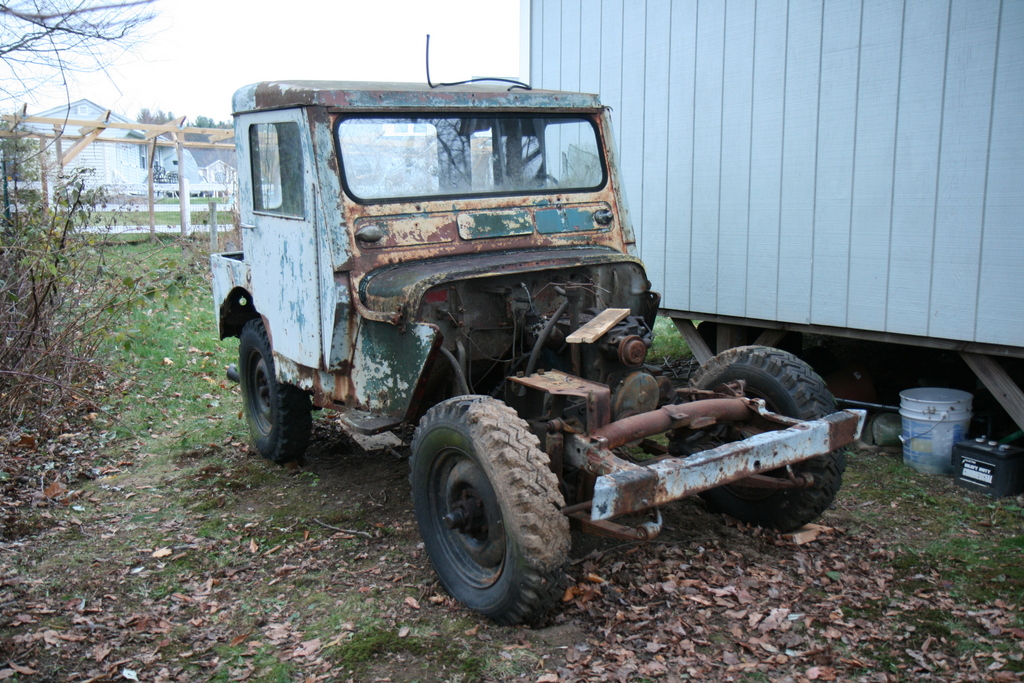

Great effort was expended to clean out the 30 years of rodent sediments, inside and out, and the demolition began.
While it is certainly obvious that the body tub has suffered from extreme corrosion, closer inspection confirmed that the frame and drivetrain bits were still very solid. In other words, there's enough there for a crazy person to perform a rebuild. And anyway, almost every conceivable part can still be had new for flat fender Jeeps and used stuff is still plentiful too.
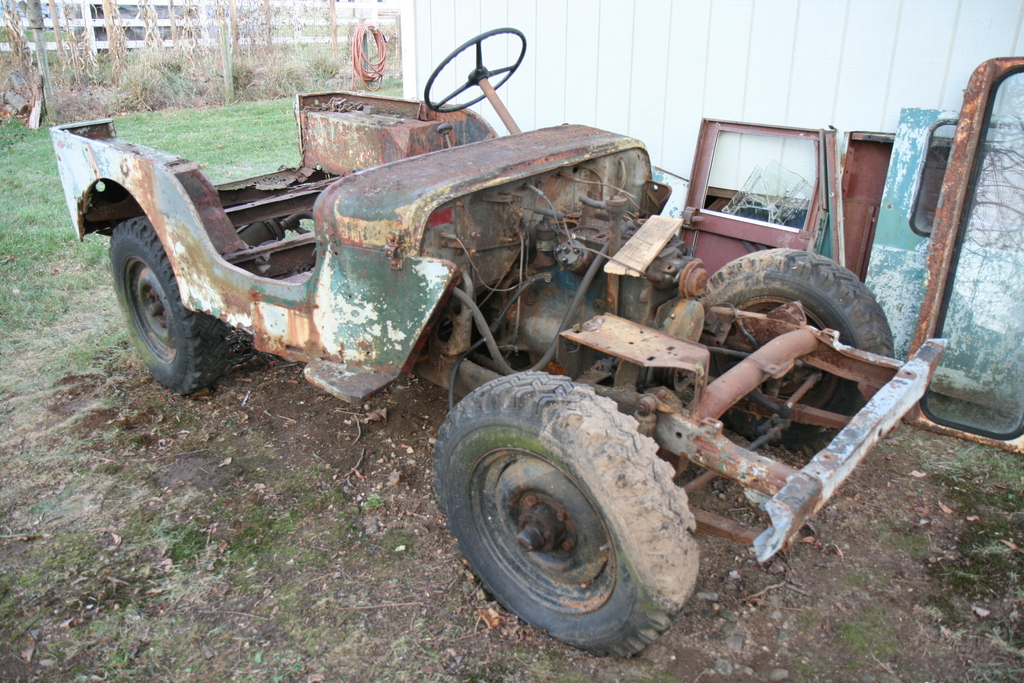
With the top and front end off, the Jeep was pulled up to the garage and deconstruction continued.
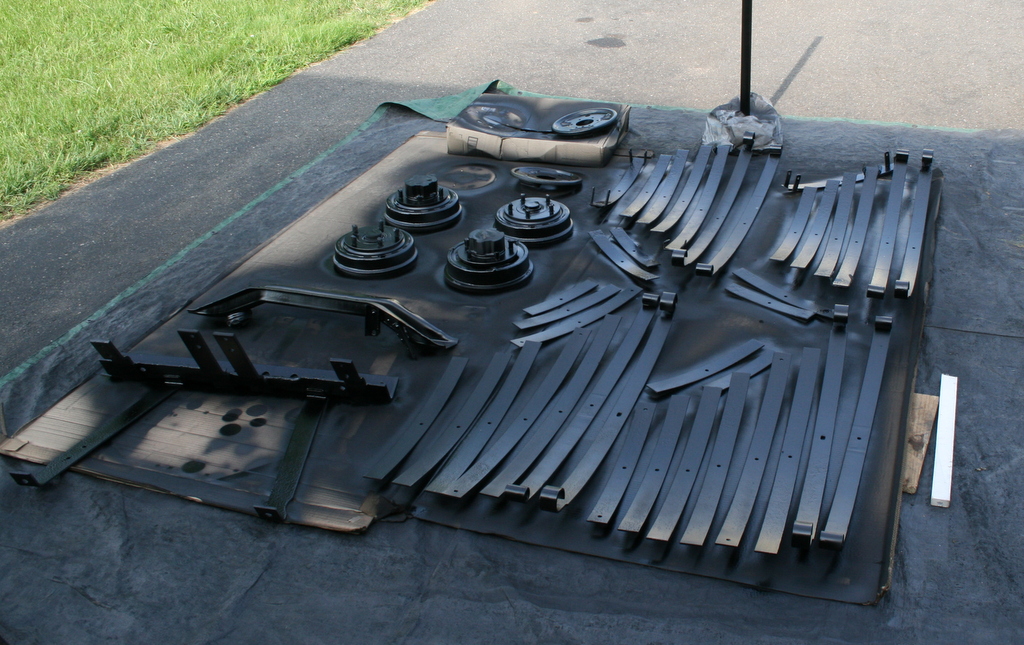
It didn't take long to strip it down and bag and tag everything. My
son and I lifted the tub off the
frame and stashed the
tub back behind the shed for another day.
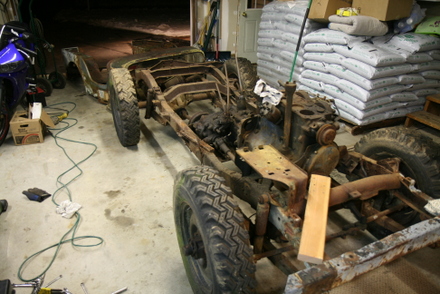
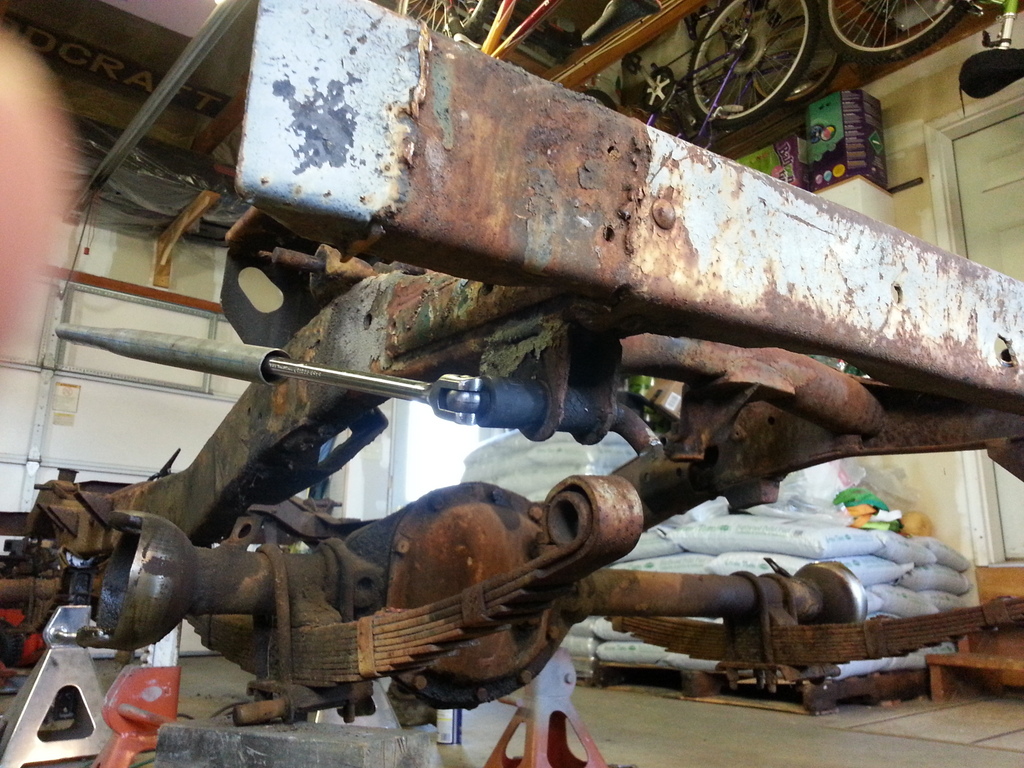
Once
the drivetrain was out, the chassis was placed onto jackstands and I
attacked the suspension. These old Willys Jeeps use fully
greasable
shackle assemblies that utilize a forged shackle in the shape of a
"C". The shackles pivot inside big threaded bushings screwed
into the frame and spring ends. A couple bushings did screw out as
shown below, but some were frozen solid inside the frame.
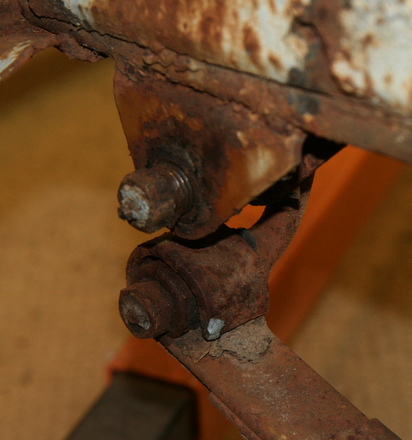
You can see the "C" section of the shackle is on the far side of the spring eye and hanger in this view. The bushing in the frame is half unscrewed on this side.
For the frozen bushings, I broke out the cheater bar and applied torch heat which turned out to work nicely. I really thought they were going to break. In the photo below, I gave up on the shackle itself and cut it, but the important thing was being able to unscrew the bushings.
(It should be noted that on CJ's prior to the mid 50's, two of the four frame bushings are left hand threaded. There are notches on the apex edges of the hex heads indicating LH threads....and yes, I knew this beforehand......)
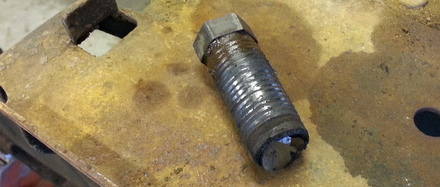
The shallow thread on these bushings reminds me of the Chrysler ball joints from the 60's:
In the end all the bushings were removed without frame damage, and
the chassis was ready for refurbishment.
The Chassis Rebuild
It felt good to have a bare frame sitting on the floor. It needed quite a combination of grinding, sandblasting and straightening. First, I was compelled to grind off the ugly plates on the front frame horns. These must have been added for the snowplow rig. In the pic below I've already started to attack the driver side plate:
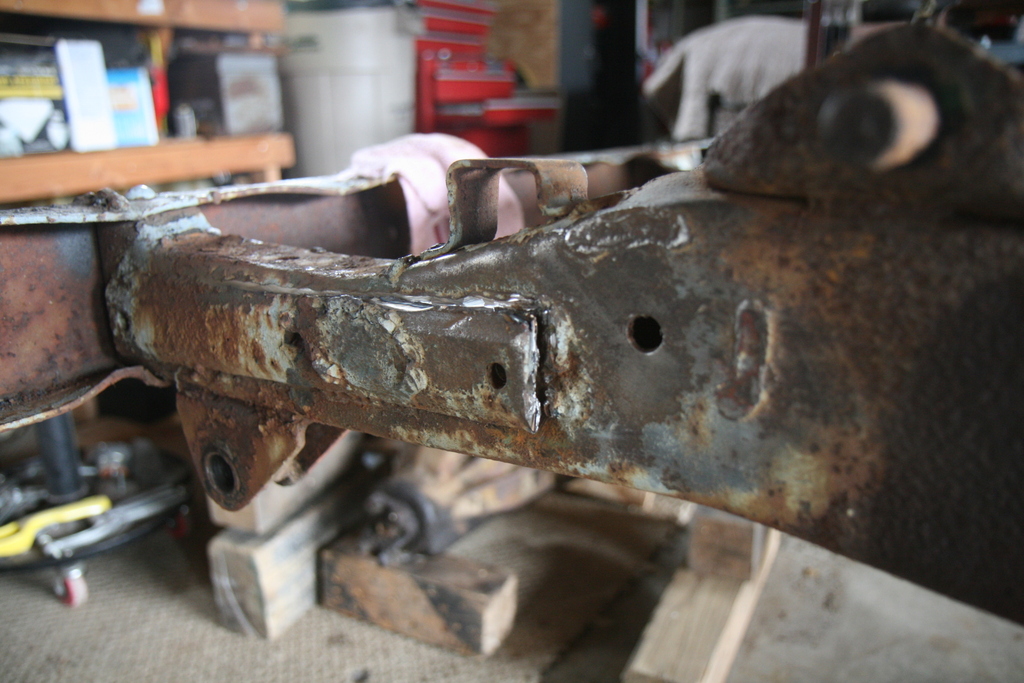
I thought they had been added to repair damage to the frame, but after close inspection, it seemed like the frame was good under there. So I cut them off and ground the weldment off:
Both sides turned out to have no damage.
Not seen is the semi-mangled rear crossmember that I managed to beat back into shape with a 3 pound hammer. The beating, and some light welding to a couple of wrinkle induced cracks brought it back to spec.

When I put the cleaned up frame on jackstands, I thought I'd check out how straight it was. I found that the spacing of the rails were too wide by about a half inch at the front spring fixed hangers, mostly on the driver side (as measured to centerline of frame).
I figured I'd have a go at straightening it myself despite not having a frame rack, because it appeared I could apply a squeezing force with the spring hanger brackets. I used a piece of 1/2 threaded rod to span from one hanger to the other (also filling the gap of each hanger with washers) and used nuts on the rod to squeeze the frame rails together.
Since the passenger and driver side rails were out of spec at different distances to the centerline, I couldn't rely on using the rod alone to bend the steel because one side would get to spec before the other. So, I only tightened the rod nuts enough to get close to the yield point of the steel, then used a sledge hammer to bend each rail separately to get to the correct dimensions. Taking out the "springy-ness" with the rod made it quite easy for the sledge hammer hits to cold bend the steel.
Note where I indicate where I hit the frame with the sledge on the frame rail (with a hardwood block to spread the force out a bit):

The technique worked really well and the frame rails now measure spot on to the centerline.
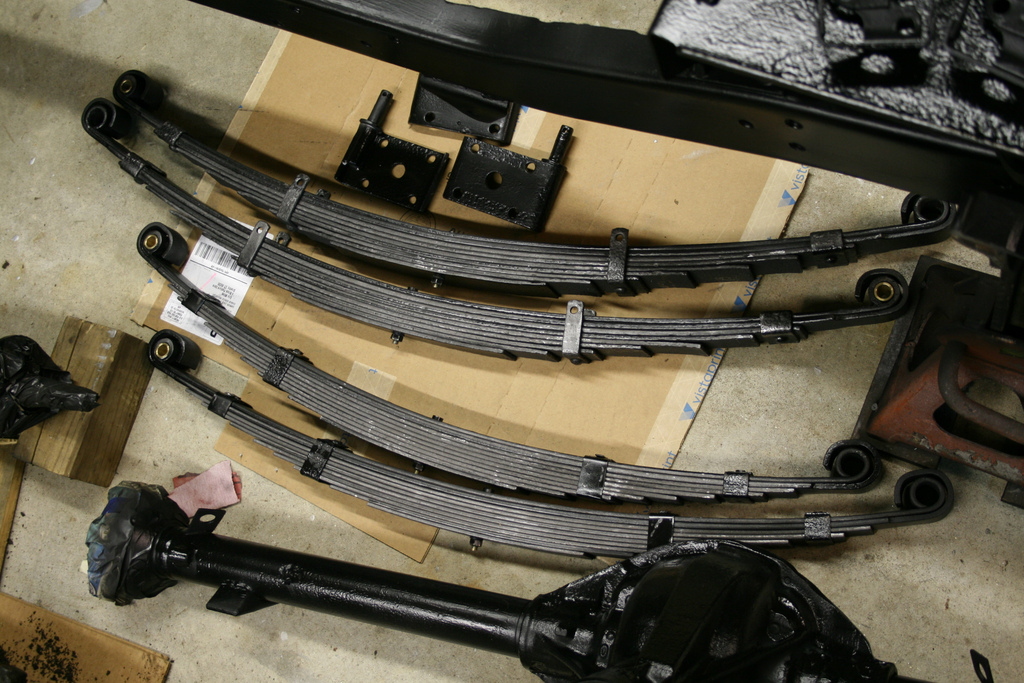
The Springs
Although pitted and rusty, the spring leaves were intact, so I thought I'd see what could be done with some wirewheeling and grinding.
These old Jeeps used leaf packs with 8, 9 or even 10 leafs per unit, which means a tedious job of up to 40 leaves to clean. I attacked with a couple of right angle grinders with a heavy wire wheel and flap disc. Since this was certainly going to be a messy job (vast orange clouds of dust) I worked outside in 20 degree weather.
The leafs cleaned up pretty nice, and they all still had a decent arch, so I finished them in Master Series primer, epoxy primer, Semi-gloss black, and finally graphite paint.
The leaf packs are held together with a combination of sheet metal wrappers, riveted tabs, and u-straps with bolts. The u-straps required some welding repair, and new bolt spacers, and I made some new sheet metal wrappers with some scrap. I pressed in new brass pivot bushings and they're ready for action. It's hard to believe they're the same springs.
Frame Paint
After all the refurbishment work, I painted everything with MasterSeries primer (as can be seen in previous pictures) with foam brushes. Next was epoxy primer and then a top coat of Kirker Hot Rod semi gloss black.

After the big painting party, the springs and axles were installed with new U-bolts sourced from Stengel Bros. of NY. The C shackles, bushings and greaseable pivot bolts were also sourced new from various vendors.
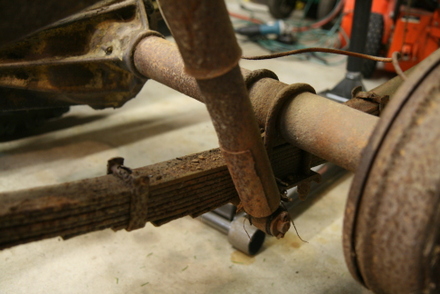
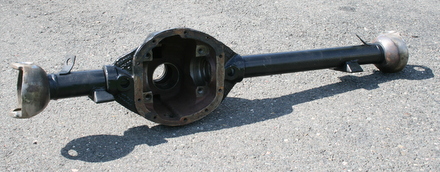
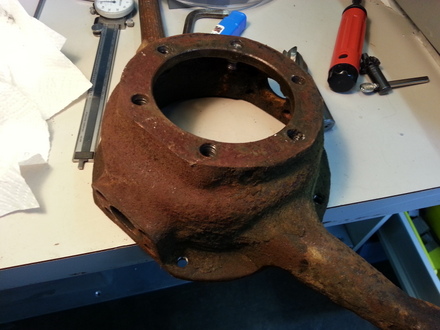
Axles
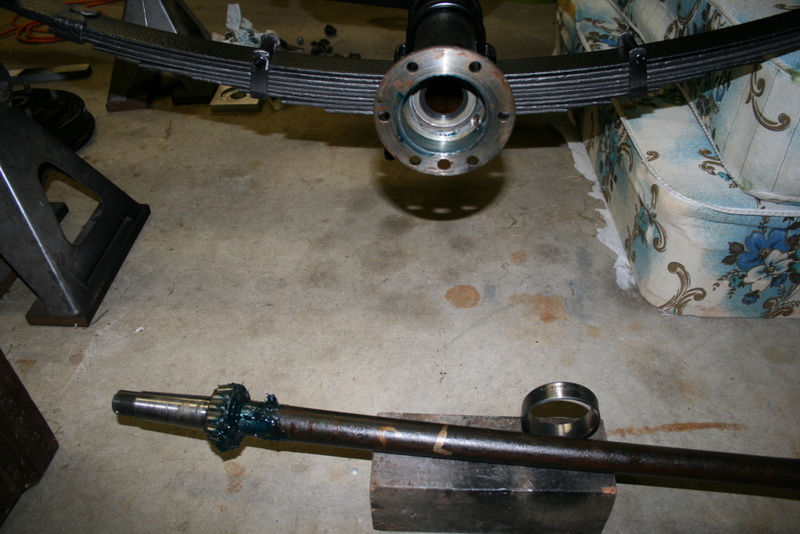
This Jeep is equipped with a Dana 41 rear axle which I believe is the original unit.
Things looked really good inside, but knowing that this Jeep sat for decades in the woods, I wanted to remove the axle shafts in order to install new seals and repack the bearings. These Dana 41's use "two piece axles" with big tapered bearings at the ends. The bearings are lubricated with zerk fittings at each outboard end of the axle housing. I got the shafts out, and then everything was cleaned, resealed, and regreased.
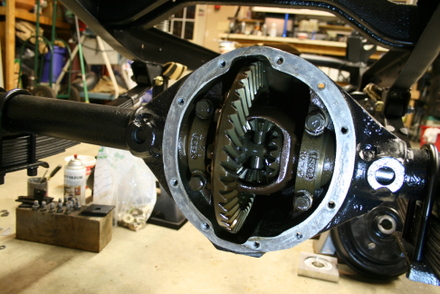
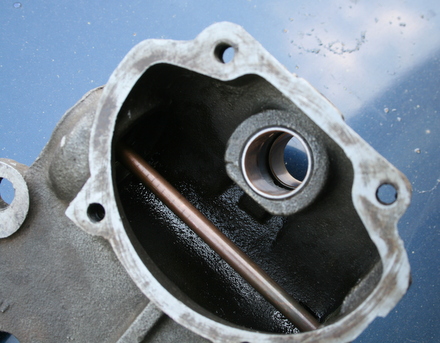
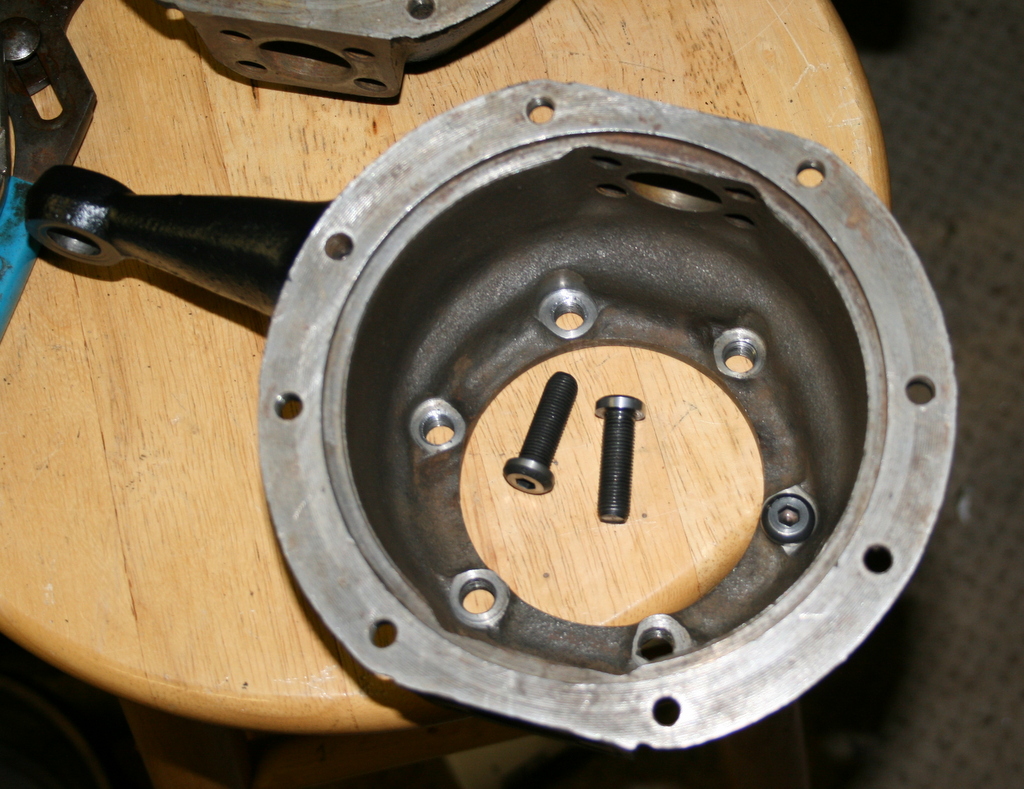
Dana 25
The front axle was a different story. With the cover removed, it was evident that sometime in the past the ring and pinion were exploded. I found loads of metal chips and flakes of all sizes spread throughout the internals.

It seems that the ring and pinion were replaced, probably without even cleaning out the housing or setting the gears up because they exhibit galling, gouges and pitting. The pinion didn't even have shims installed (which are necessary for maintaining proper pinion bearing pre-load).
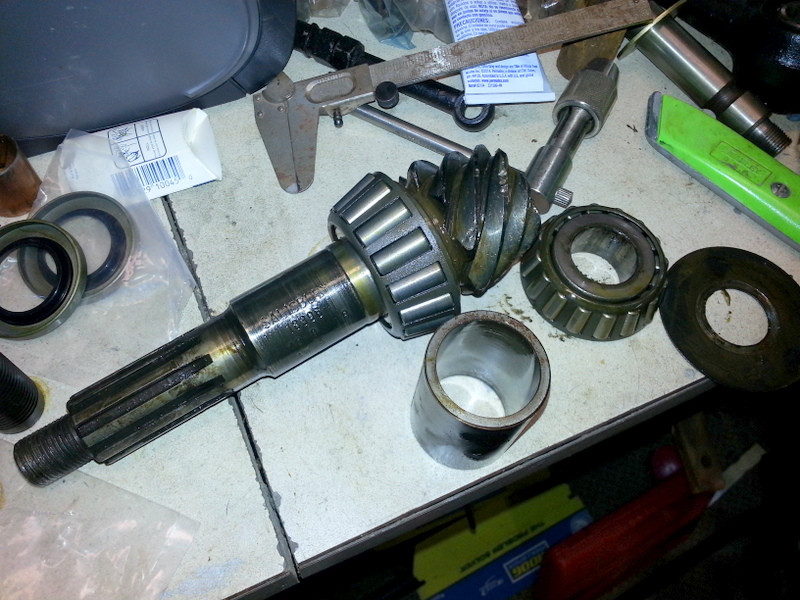
I took it all apart and cleaned the dickens out of all the parts.
I didn't replace anything except the seals. Yep, I even kept the bearings. (I can imagine the winces from some readers)
I did buy a set of shims and set up the correct pinion preload. The gear contact pattern was checked, but it was pretty ugly, so I let it be. They can grind away at each other while I casually seek out a replacment Dana 25. [UPDATE: a used Dana 25 has been procurred and the task to swap it for the crunched original has been put on the grand list]
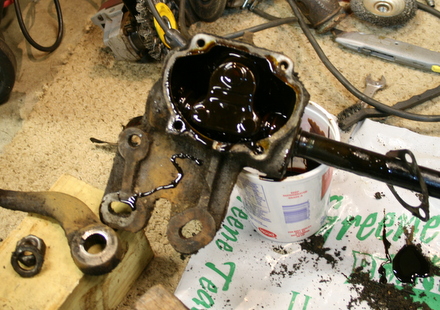
Ross Steering Box
The steering box was almost unrecognizable under gobs of gunk. but after scraping, I found a well preserved Ross steering box. It even had oil inside. Deep, dark, thick ooze.
Note
the witness marks (above photo) on the lower left boss on the
Ross box from the thin
shim washers where it was mounted to the frame. Evidently they took
care to make sure the steering system alignment was good from frame to
body.
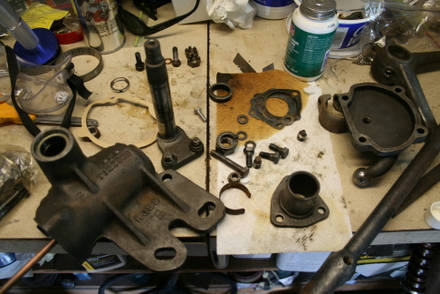
There was some wear on the sector shaft cone/pins, but it looked decent enough to re-use. I replaced the shaft bushings in the box and honed them to size with a wheel cylinder hone until the sector shaft fit back into the box.
The
box was bolted back together and the copper sealing washers were put
into proper position on two of the cover bolts. Since I'm re-using the
worm ball bearings, I was able to re-use the original pack of pre-load
shims on the top
cap. The steering tube
still had the "oil hole cover" for the column tube and I filled the
unit with 140 weight oil from there.
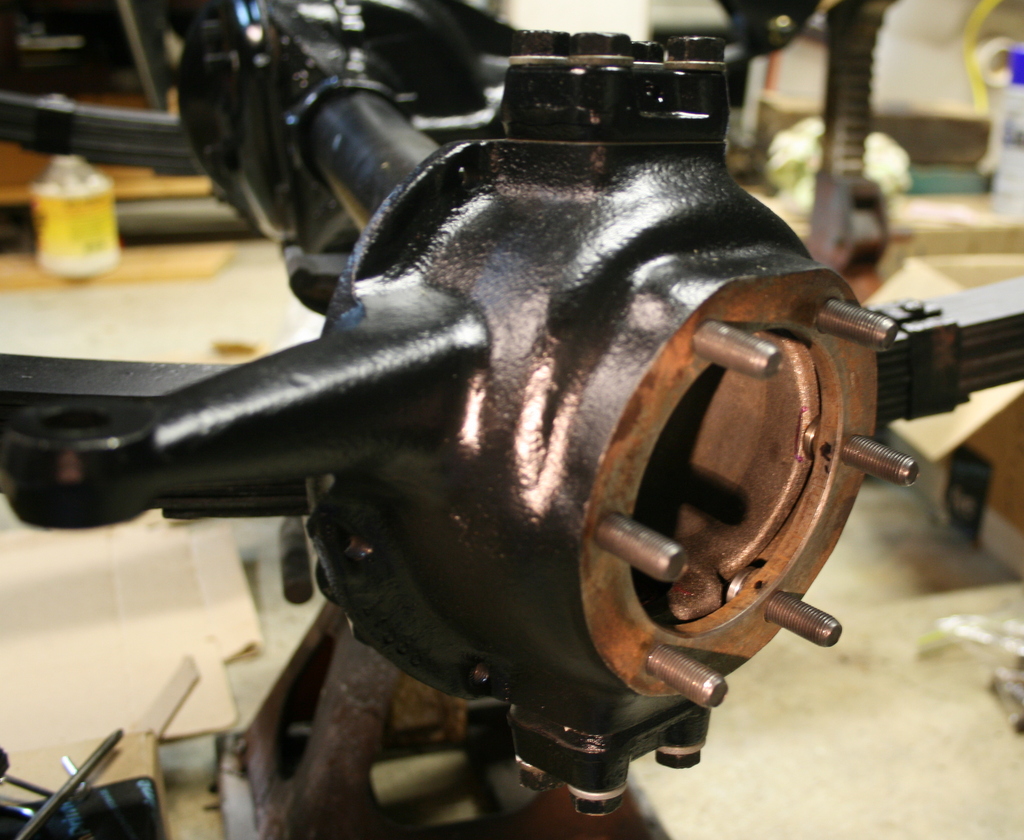
The Knuckles
The SPICER designed front axles for the Willys Jeeps used a cast
steel knuckle that completely enveloped the u-joint at each wheel. The
spindle for the wheel bearings bolted onto the cast knuckle with six
fine threaded bolts. The knuckle is relatively soft and had the
somewhat infamous habit of stripping out allowing the front wheel to
fall off the axle. This is one of the knuckles from my Willys, and
several of the threaded holes were indeed stripped.
With a subpar situation like this I decided to go with a fix that retains the spindle with studs rather than bolts. Since these knuckles don't have much "meat" in the casting for studs you can instead use Button Head Cap Screws inserted from the inside so that the threaded portion sticks out and function as studs. I used grade 5 3/8"-24 x 1.25" screws.
The areas around the holes inside the knuckles are rough cast which
is not ideal for seating screw heads, so they must be spot faced with
an endmill, and then a generous chamfer should be machined in (to
acommodate the screw head fillet).
Once installed, the screw heads at the 9 and 3 o'clock positions will likely interfere with the ball end of the axle, so careful notching is required to maintain full turning radius. In the picture below, I've marked the ball at the 3 o'clock position with a marker indicating the area to be trimmed. If carefully done, the notch won't breach the ball seal surface areas.
I acquired overseas knuckle kingpin bearings from a supplier on Amazon for an incredibly low price. We'll see how they do!
All this was installed per the procedures found in the Willys
Universal Jeep manual. The preload is measured by pulling on the tie
rod arm with a spring gauge.
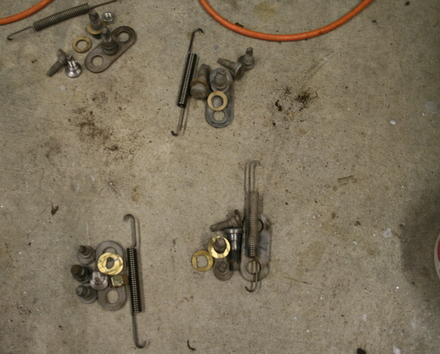
The Brakes
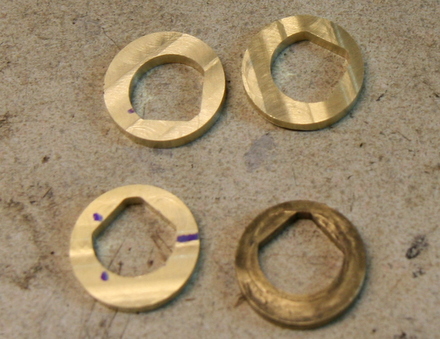
Willys CJ3A's were quite simple in the brakes department. The Bendix system design consisted of a single circuit hydraulic master cylinder with a drum brake at each wheel. The Bendix system was so basic that there were no self adjusters for the brake shoes. It is necessary to manually adjust the shoes by rotating cam bolts to keep the brake shoes close to the drums.
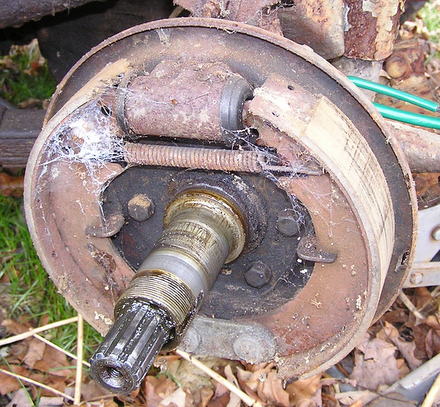
There are upper and lower cams for each shoe. The cams are behind the shoes in the above photo. The upper bolts have eccentric circles on them, while the lowers are actually shoulder bolts with brass eccentrics installed onto the shoulders. You can see the heads of the shoulder bolts at the bottom of the shoes.
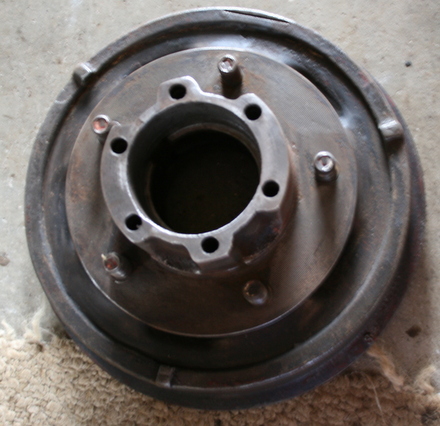
This Jeep still had it's original brake system but with problems: The master cylinder was rusted solid, the brake lines were squirrely replacements, the brake shoe adjustment cam bolts and eccentric cams were not installed correctly, (or not even there,) and unfortunately one of the otherwise excellent condition drums was bent from a botched wheel stud replacement.
Once it was all taken apart, I began a parts sourcing campaign. I put out a plea for a straight brake drum and JeepFever from the CJ3A boards kindly donated one for the cause. It's a CJ2A era drum, but it's form, fit and function are perfect for the CJ3A. Note the slit at the top of the drum...this is where you insert a feeler gauge when adjusting the shoe to drum gap. The CJ3A drums have more of a square hole for this.
You can buy new eccentrics for the shoulder bolts, but I made some to replace the missing ones.
I bought a few new springs and upper cam bolts, then sandblasted everything and sorted the parts into piles for each drum assembly.
I purchased two new 3/4" wheel cylinders for the rear, and rebuilt the two 1" front wheel cylinders. I found a new Raybestos master cylinder on Amazon for 37 dollars. I reused the shoes that were on the Jeep as they seemed to have been newly installed when the Jeep was retired.
Everything was blasted sanded and painted, and then reassembled. I purchased a bunch of brake line sections from the local parts store and cut, bent, and formed them to fit with a crappy flare kit. It's a bit of a mashup with copper nickel lines for the axles, epoxy clad for the frame lines, and plain zinc plated for the front axle.

All the line clamps on the axles were gone, so I fabricated my own clamps with sheet metal and machine screws. They look and work good.
I managed to clean the original brake light switch. It's kind of a funny design that uses a pressure switch rather than a mechanical switch. Don't know if it works, but it looks good! The master cylinder was bled and after shoe adjustment, and the brakes worked!
Back On It's Feet
With the four corners ready to support weight again, I put on the old wheels and tires; but not before sanding away some old paint on one of them. I was happily surprised to see that it still has it's original cream wheels with luzon red pinstripe under the layers.
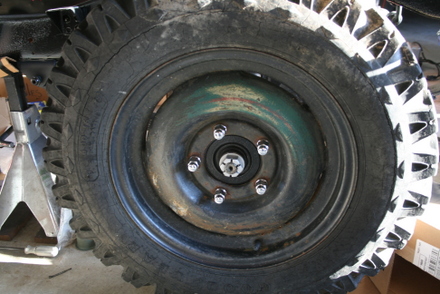
I wanted to get new acorn lug nuts, but they're a little pricey. So I bought a chrome wheel lug nut kit for something like 16 dollars to my door from eBay. Savvy Willys folks will know that these old CJ2A and CJ3A Jeeps had left hand and right hand lug nuts. The nut kit I got was for late 60's MoPar cars that had LH wheel studs on the driver side and RH studs on the passenger side of their cars. (Other manufacturers did the same thing at various times in the fifties and sixties as well.)
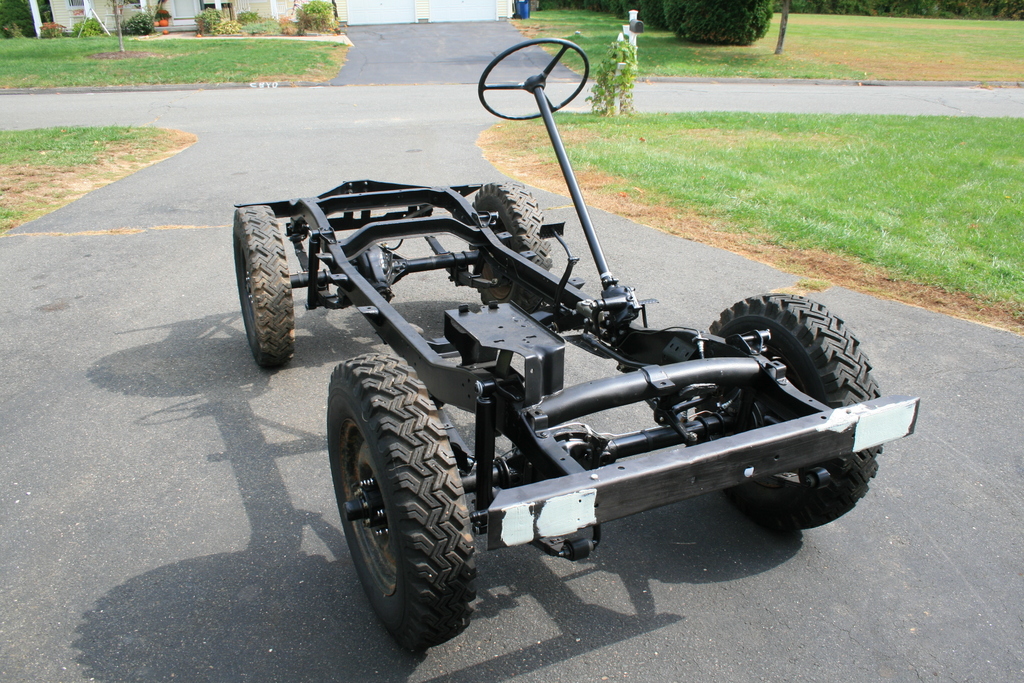
So here's the frame ready to go...
Next up...some drivetrain work....
SFS
CJ3A Drivetrain
January 22, 2017
This old Jeep is mostly blown apart, but two exciting
unknowns remain unexplored: the internals of the gunky transmission and
transfer
case.
The units were crusted with many pounds of oily dirt, and I had been putting off the task of chiseling it off and cleaning them.
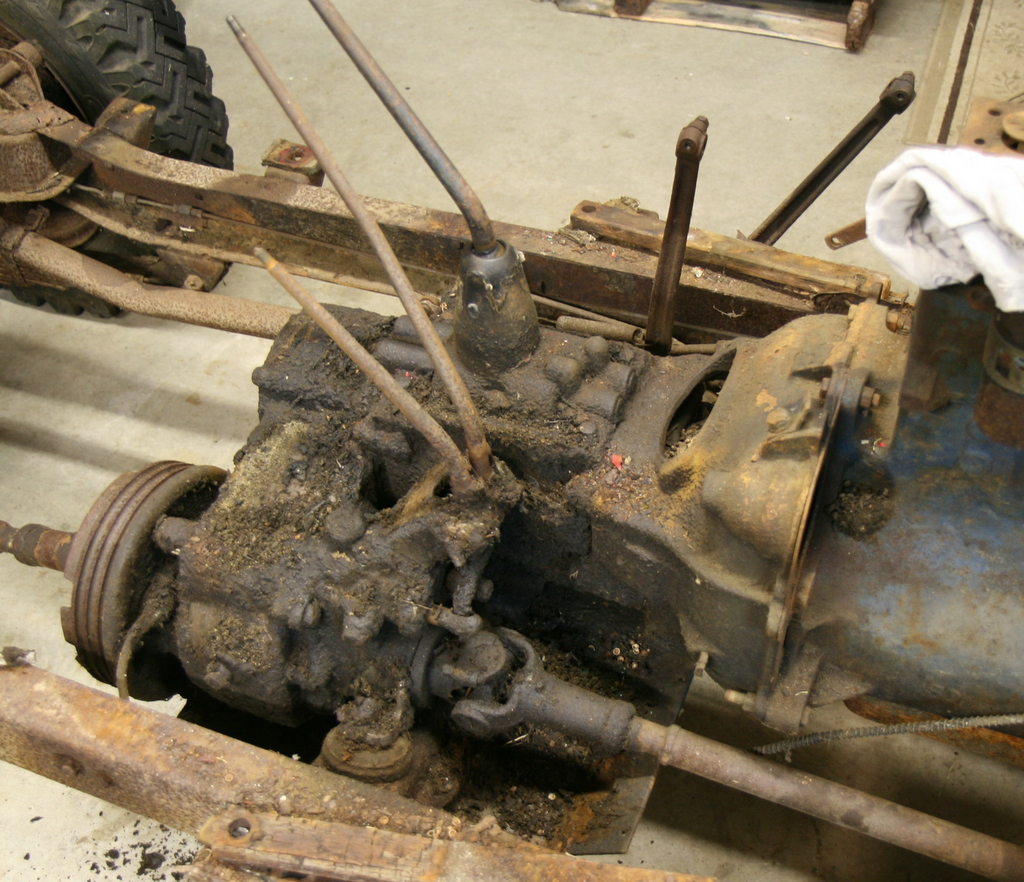
The day finally came to do something, and I had a Tom Sawyer moment by convincing my brother-in-law to scrape down the trans and x-case for me. Woot!
What we unearthed is what I believe to be the original components this CJ was delivered with: I found July 1950 dates on the transmission, and the transfer case and propeller shafts showed signs of never having been apart.
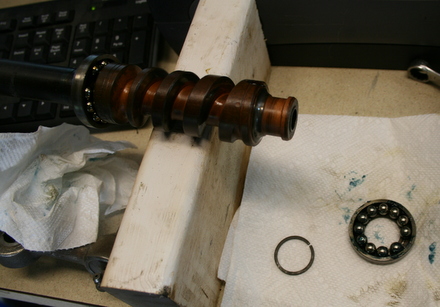
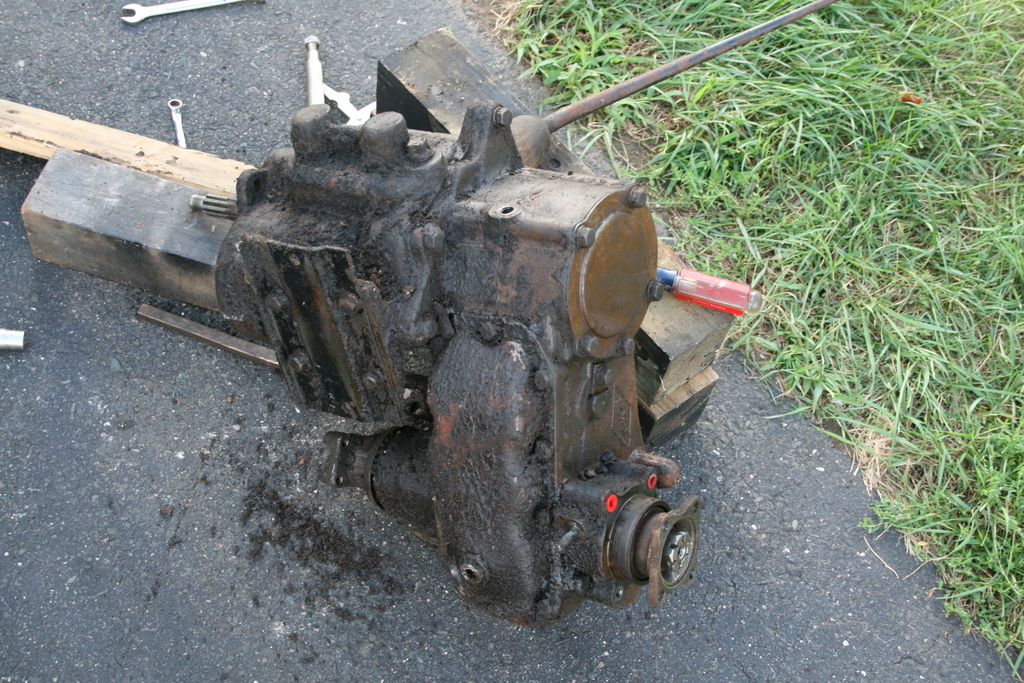
Dana 18 Transfer Case
Despite the Jeep having only 35,000 miles, I was concerned the side drive Dana 18 might be worn out becuase of an unknown maintenance history. These units are sensitive to intermediate shaft wear issues if neglected. And indeed, I was alarmed when only a few ounces of oil drained out when I cracked the drainplugs. A complete inspection was necessary, and besides, at minimum it required a complete re-sealing. Armed with gaskets, seals and the Novak rebuild guide, I took it apart.
I was happy to see all the internals looked really good. The only thing amiss was a broken poppet ball spring. I was confident I could re-use all the parts so everything was cleaned and prepared for reassembly.

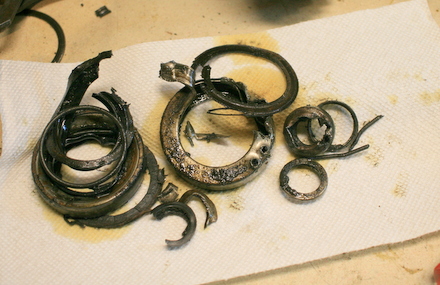
A huge effort was required to remove the original seals. These things are reeeeally hard to remove. There was much blue air whilst attacking them with drywall screws, chisels, and screwdrivers.
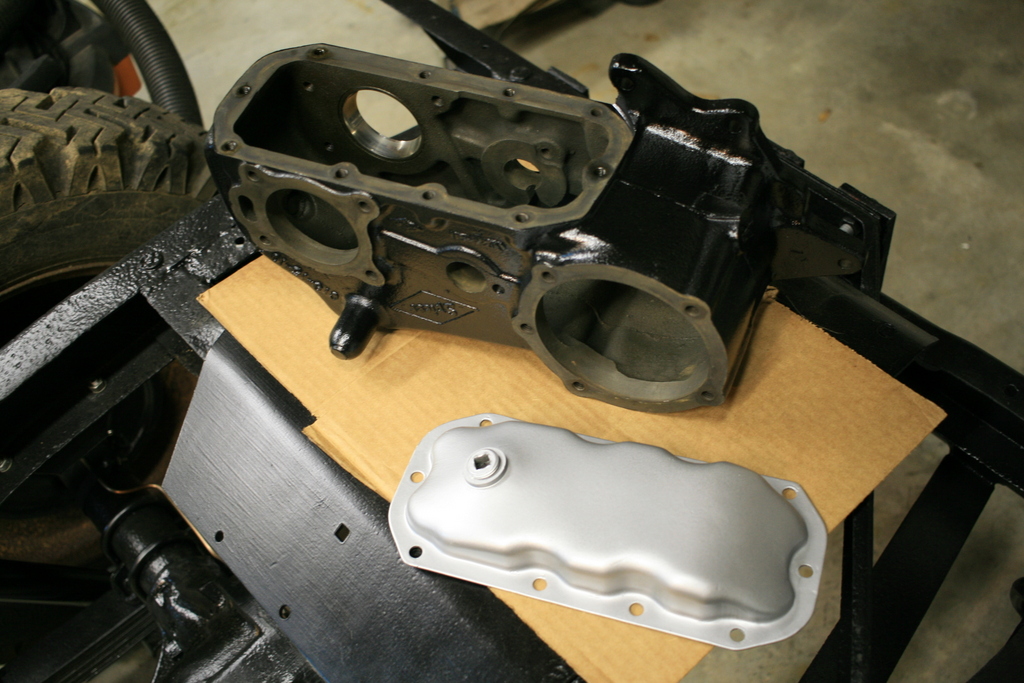
Reassembly is straightforward. The only specialized tool needed is a dial indicator for setting the output shaft endplay (rear bearing cap shims). I ended up re-using the original shim stack as I didn't swap out my bearings. I checked the endplay and it was still fine.
T90 3 Speed Transmission
For the transmission, it was easy enough to inspect the internals by simply removing the shift tower. And it all looked good and clean. I did remove the front bearing retainer for inspection, but even with that I decided not to replace the felt washer; the orignal looked better than the one in the gasket kit.
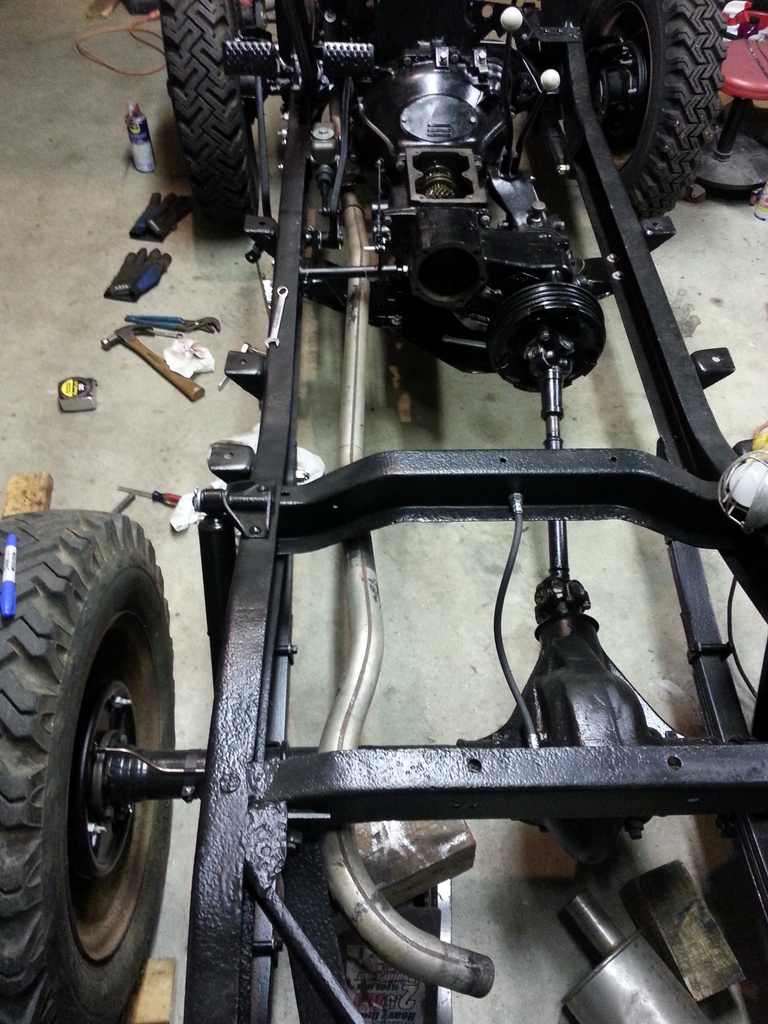
The combo was bolted back together and plopped onto the (now straightened and painted) crossmember and skid plate. I cleaned and re-used the carriage bolts for the skid. Why not?
The engine was kinda ugly compared to the newly painted tranny and x-case, so I cleaned the dickens out of it and painted it black.
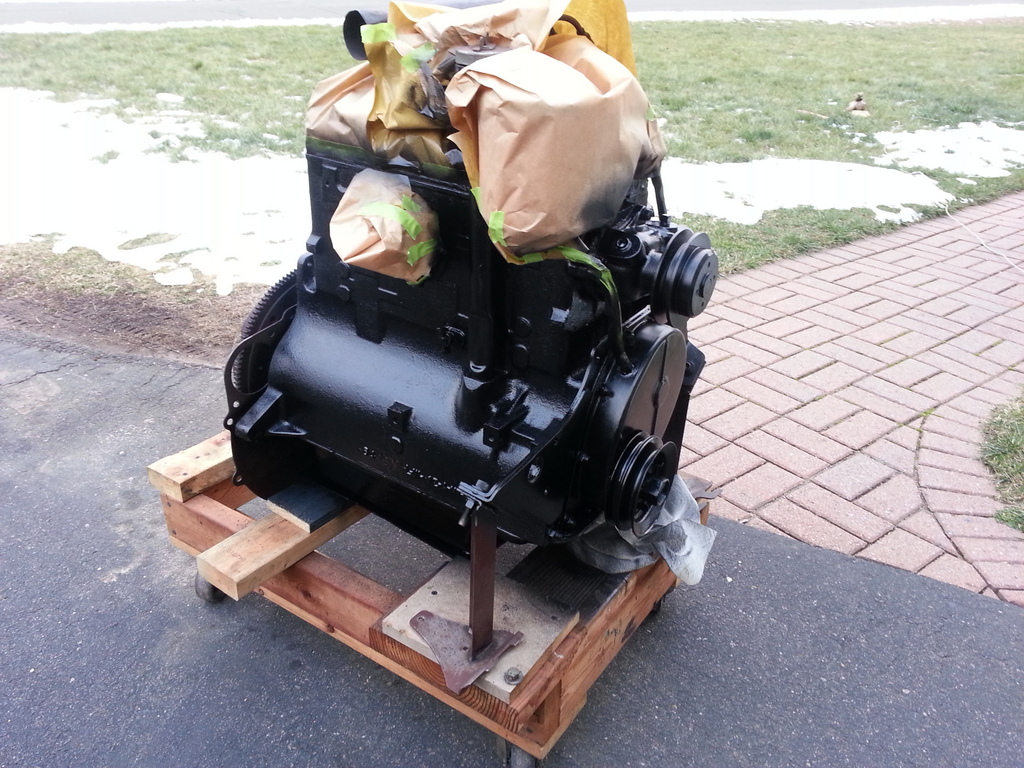
The whole business was put together and installed into the frame.
Running CJ3A Chassis
Getting this Jeep running and moving was tantalizingly close, so I
worked hard to tackle all the ancillary stuff to make it into a running
vehicle. I fitted the grille/radiator/crusty shroud assembly, and made
a
terrifically goofy instrument panel for the tub-less chassis.
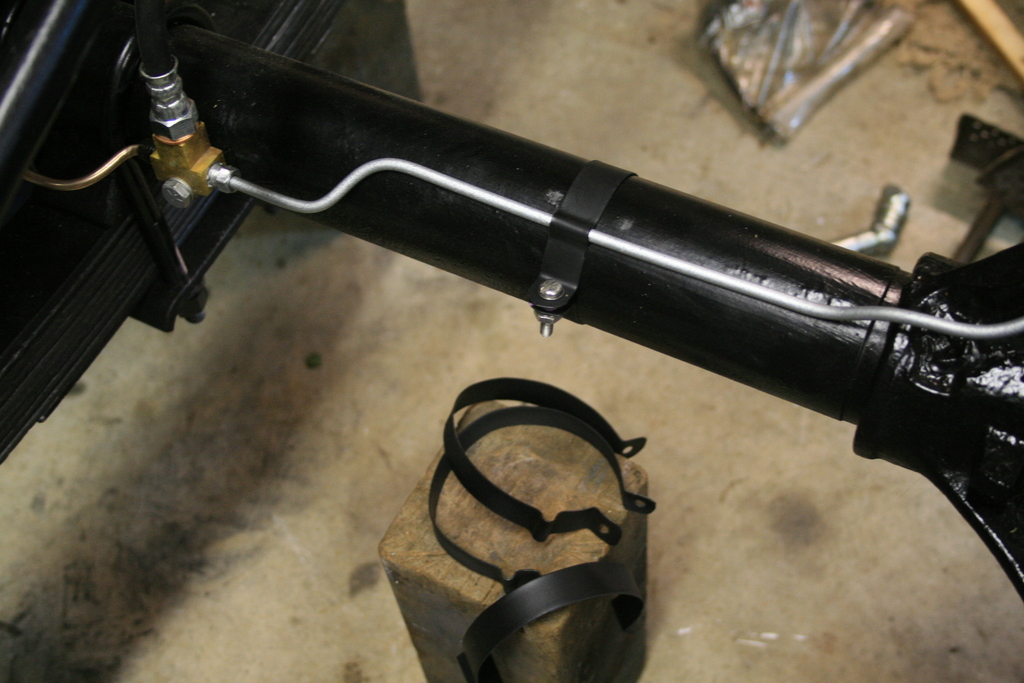
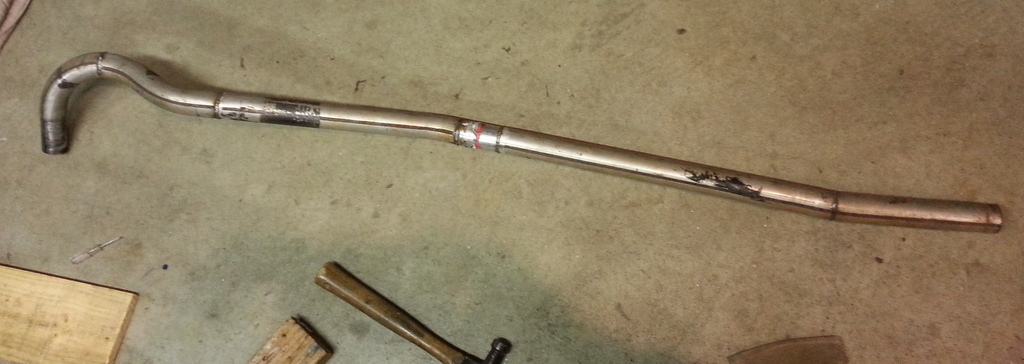
I installed the exhaust system that came with my engine deal but not before cutting and rewelding the intermediate pipe to fit tighter/higher. If you'll look closely, you can see where I added some extension sections and also "clocked" some of the pieces for better fit.
A bucket
seat was fastened to some lumber and bolted down to the frame, and I
fired up the
Jeep in triumph. I only managed a couple spins around my block before
realizing that some issues needed attention.
Radiator
(Note: A more comprehensive
"report" will me made of this aluminum radiator installation at a later
date...for now I'm just giving the highlights...)
The joyride around my street was fun, but I noticed a mist coating
of coolant on my glasses with each lap. I found several seam leaks and
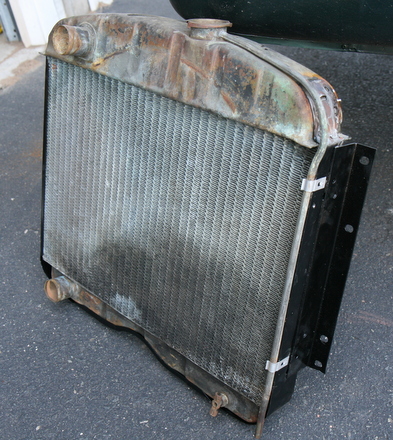
a crack in the top tank of the original Harrison radiator. Since the
construction type of this radiator is not traditional bucket style
tanks, it is expensive to fix. It was time to get a new radiator.
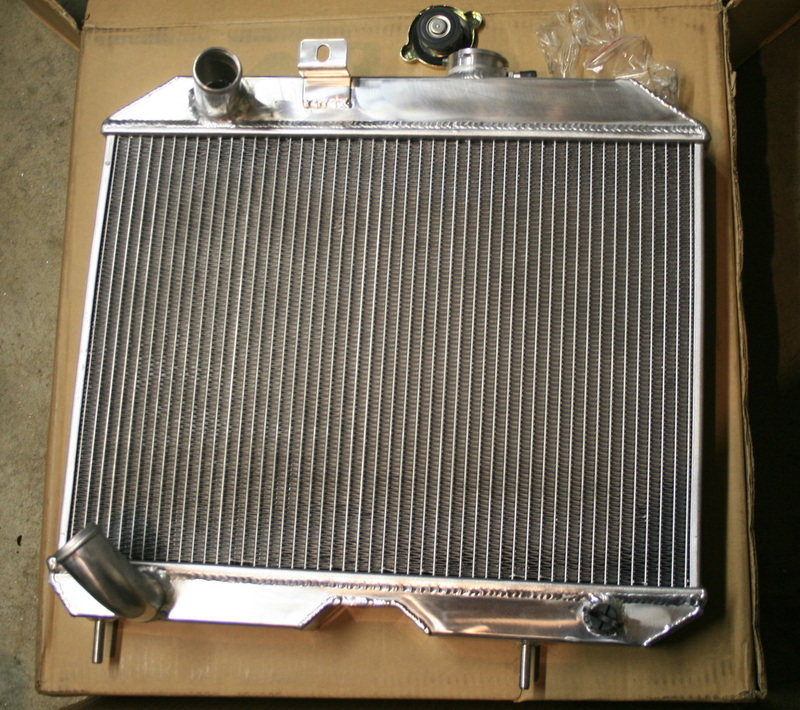
Copper/brass replacements are on the order of $500 and they're not even original looking, so I decided to go for one of the new overseas aluminum radiators. There is no replacement aluminum radiator made for 1950 and up CJ3A's, but the CJ2A style can be made to fit with modifications. I purchased a '2A unit from an ebay supplier for $135 to my door.
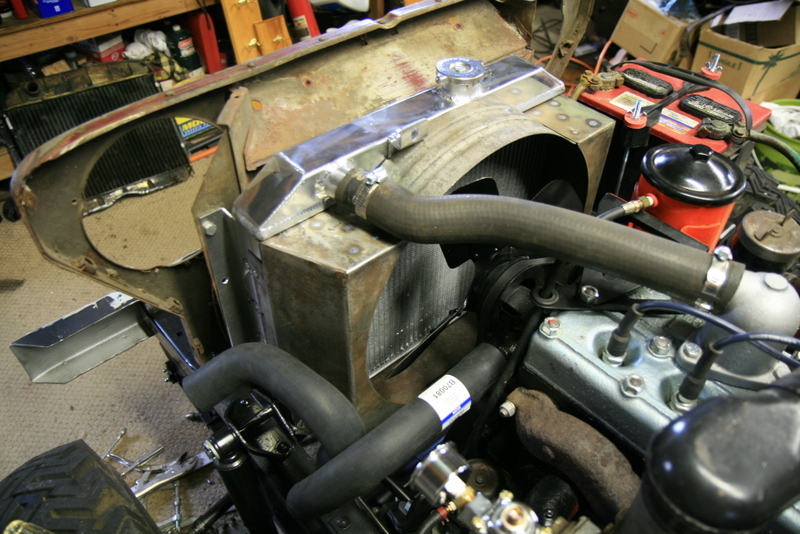
The easiest way to swap in the '2A radiator is to convert your Jeep to a bottom mount fit, but I wanted to keep my original (arguably superior) side mount '3A fan shroud. So, I performed extensive mods to both the new radiator and original shroud to make it all work.
Despite the glaring, shiny aluminum, it looks pretty good in there. Here you can see I'm trying to figure out my bottom hose.
Completing The Debugging
Testing confirmed the new radiator works fantastic. But one last
thing was the pesky rich running condition. I made and installed a shim
plate for the fuel pump, but that still wasn't enough to reduce fuel
pressure to the Solex carb, so I bought a Holley pressure regulator and
a cheapo fuel pressure gauge.
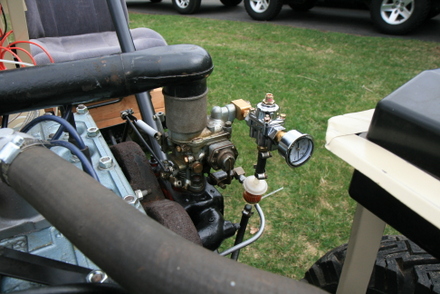
These Solexes allegedly prefer 1.5 psi fuel pressure so I turned it down to that, and indeed the carb isn't all wet with gas anymore while running. When the body is installed I'll configure a nice fuel delivery setup.
So it's a neat little machine.
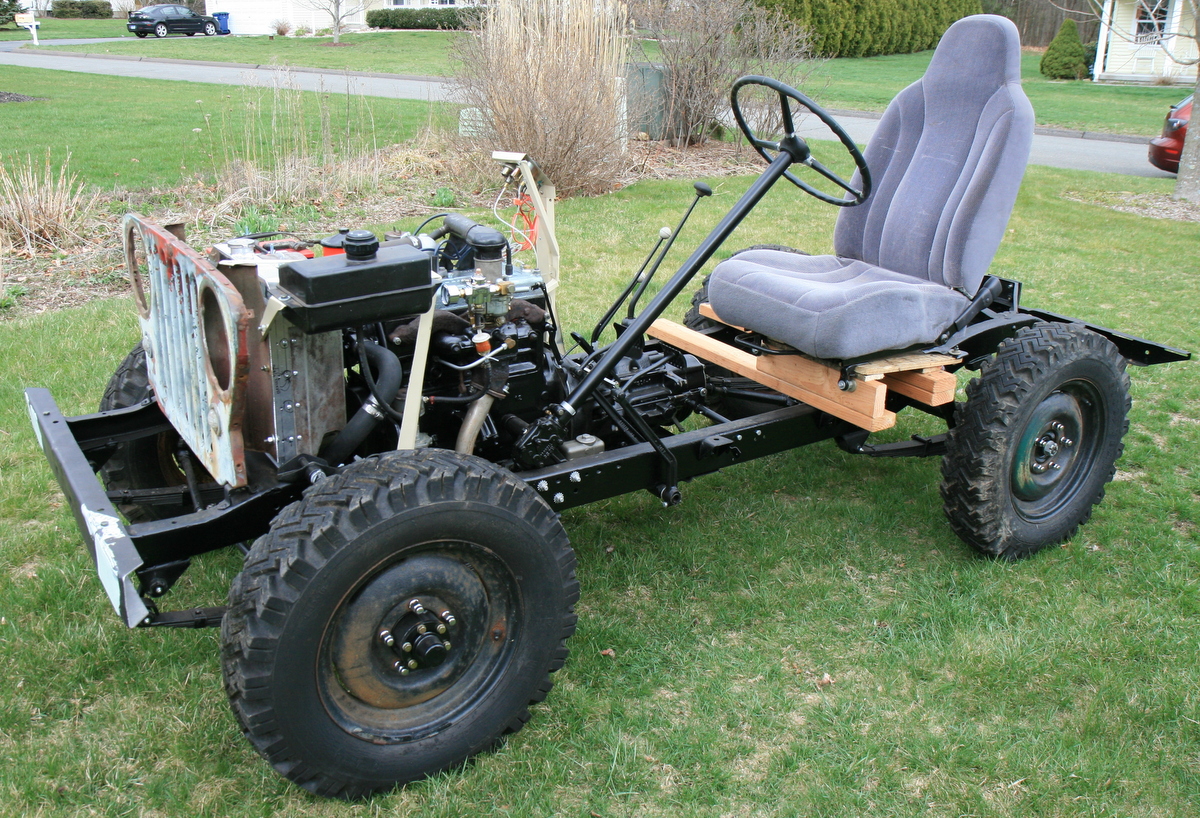
Just seeing the Jeep sitting there with only a grille was a thrill. And it was awesome to take it for rides around my neighborhood. Once I got it running around my 'hood, some of my neighbors, my kids, and wife (!) took it for a spin too! It was fun. Click on the link for video!
Next is bodywork....teaser shot of the tub ready for demolition....
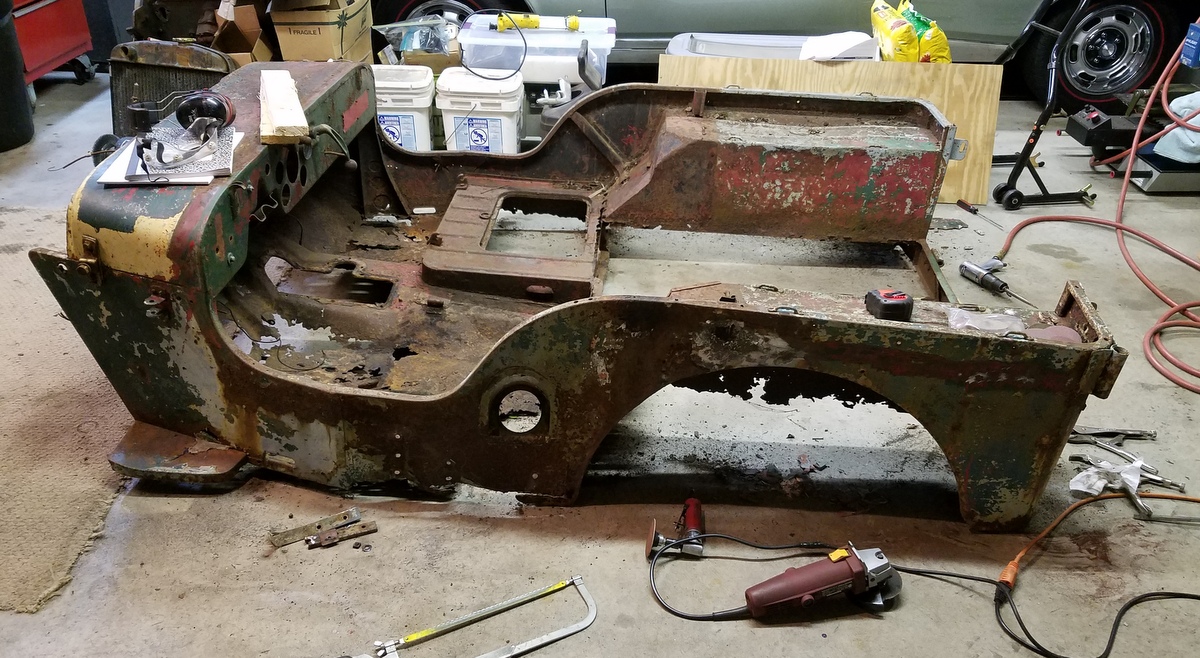
Click Here to go to the "CJ3A Bodywork 1" page.
SFS
Links:
Willys Jeep CJ3A Forum
There exists a nice set of webpages for CJ3A's. It's got a forum too that caters to both '3A's and CJ3B's. It's a great resource, and frequented by very knowledgible folks.
1967 GTO Original Owner
These two videos feature an original owner GTO. This car was featured in Hemmings Muscle Cars magazine a couple years ago. Part 2 has inside and outside shots of the owner driving the car. Very nicely done.
Blues Maker
"Mississippi" Fred McDowell. One of the great Bluesman. This is a documentary made in 1969.
Pinstripes
Pinstriping the ol' fashioned way. Pretty nice.
MGB Racecar
I've always liked MG's. Watch this MGB lift it's inside tire a few inches off the tarmac when going "'round the bend". Awesome.
Pepsi Throwback

Pepsi has put out a "limited edition Throwback" version of Pepsi with REAL sugar, instead of high fructose corn syrup which has been used since the 80's. Holy cow there IS a difference; it's WAY better. Find some quick!