
Projects:
GTO
My
67 Pontiac GTO
Trunk Body Work
-Trunk pans
-Wheel wells
Body Work Part 1
-Rear Quarters
-Rear Door Jambs
-Window Reveals
Body Work Part 2
-Cowl
-Pillar
-Rocker
Body Work Part 3
-Windshield channel
-Doors
-Fenders
GTO Paint
-Filler work
-Priming
-Blocking
GTO Frame Work
GTO Convertible Top Pt 1
-Top Frame
GTO Convertible Top Pt 2
-Top Trim
GTO Drivetrain
-Engine
-Quadrajet Rebuild
-Exhaust
-Axle
Muncie
Rebuild
popular
Auto to Manual Swap
1967
Ram Air GTO
story
Wheelhouse Filler template PDF
Willys CJ3A
CJ3A Intro
Engine and REBUILD
Drivetrain
BodyWork 1
BodyWork 2
BodyWork 3
BodyWork 4
Paintwork 1
Paintwork 2
Final Assembly
Final Assembly 2
Electrical System
Other Rods
TJ Wrangler Rubicon
CJ7
CJ8
Decrepid Dakota
Powerdyne Minibike
Allis Chalmers B engine rebuild Part 1
Allis Chalmers B engine rebuild Part 2
Allis Chalmers Generator to Alternator conversion
Gizmos
Stereo camera
rig
Stereo mic preamp
About:

Feeds

Markup
CJ3A Bodywork Part 1
This is a page featuring the rebuild and refurbishment of the body tub and sheet metal of a 1950 Willys CJ3A "Universal Jeep". Scoll down for latest updates.
Demolition
Spring, 2016
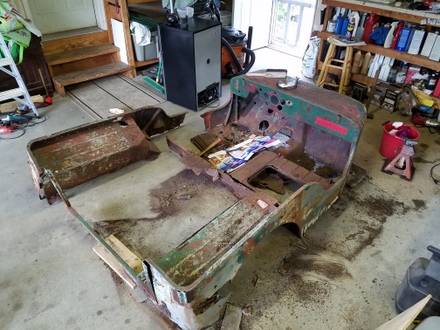
I've got a running, driving CJ3A chassis now, but the body tub (while certainly a winner in the "patina" department) has structural problems. A new reproduction tub would take care of business, but I just want to spend my own labor, not big bucks. I'm going to see what I can do with some sheet metal and time.
The damage is severe enough that I deem it's not practical to patch; it will be easier to cut the entire tub apart and replace floors and sides with new metal. I can handle mostly flat sheet steel with simple bends.
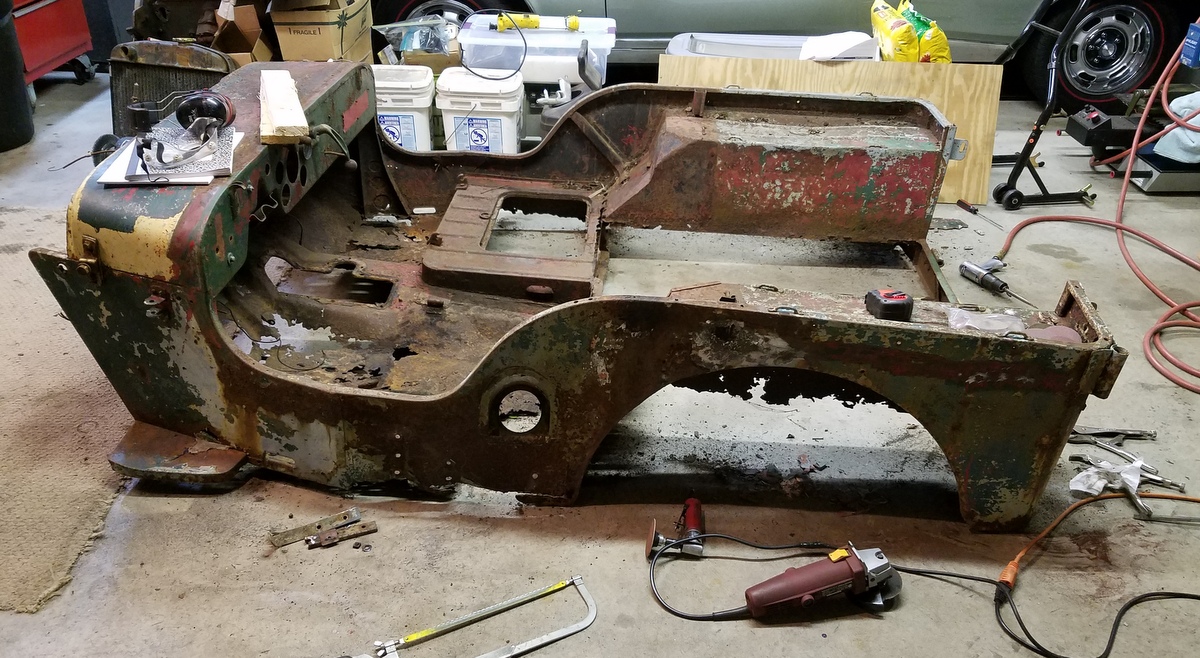
So, armed with drill bits, sawzall blades, electric cut off wheels, chisels and hammers, I spent a couple hours taking the tub apart. I sanded some panels to find signs of spot welds, then drilled them out:

It didn't take long to blow apart the rear half of the Jeep. The
driver side wheel house and tub side weren't held on by much. It was actually "freeing" to take the tub
apart and somehow makes the tub repair
seem more manageable.
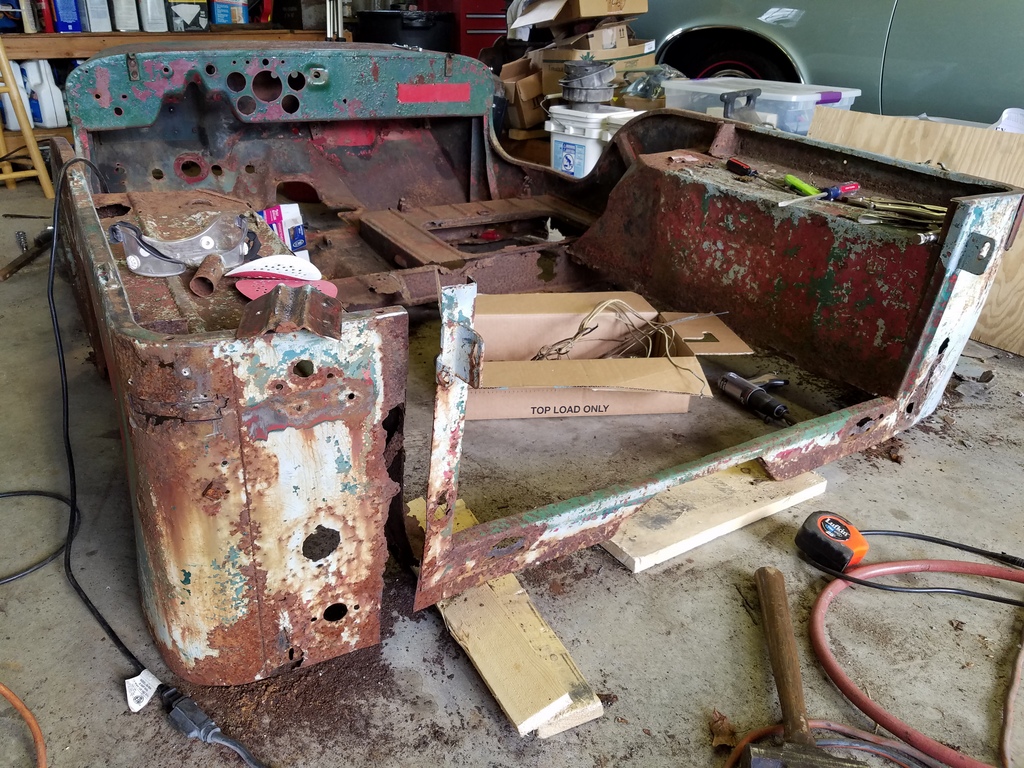
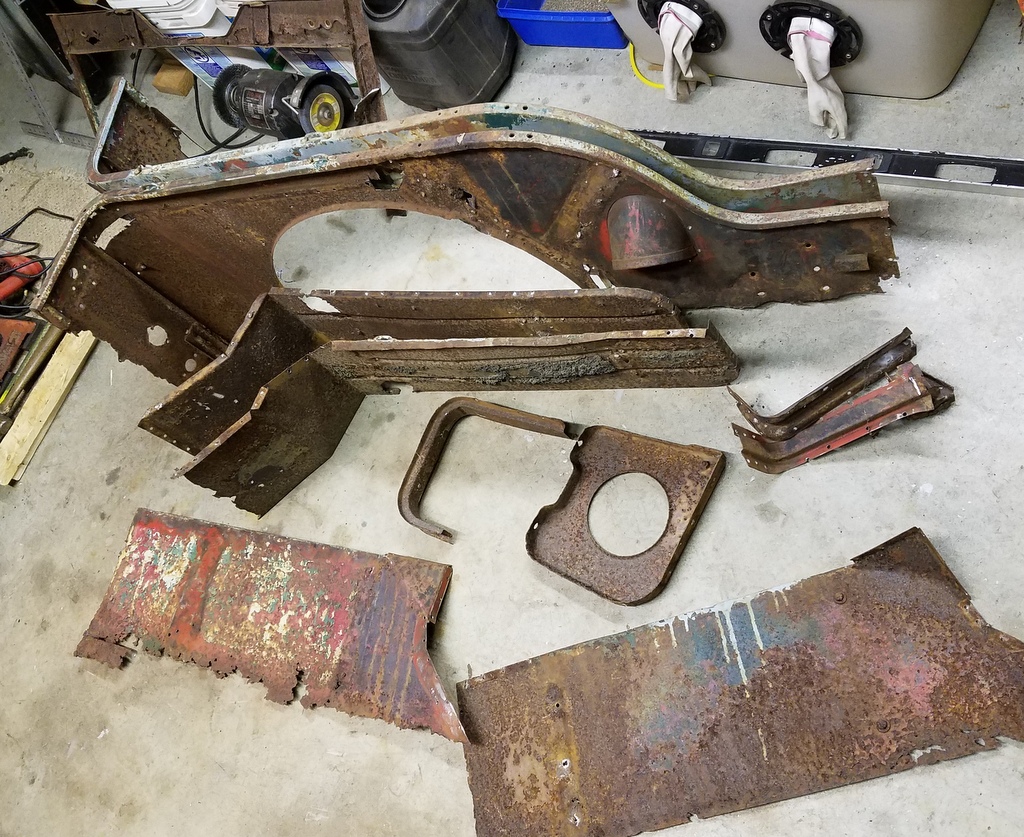
Some parts are reusable such as some brackets and braces, and I
actually want to keep the wheelhouse tops despite their hammered
condition. I intend to beat them back into shape as much as I can,
patch them, and weld 'em back in. I think the well used (yet cared for)
look will be "cool".
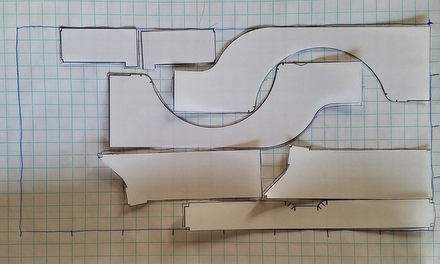
I purchased two sheets of 4 X 8 18 gauge sheet metal and 24 feet of 1" X 2" rectangular tubing.

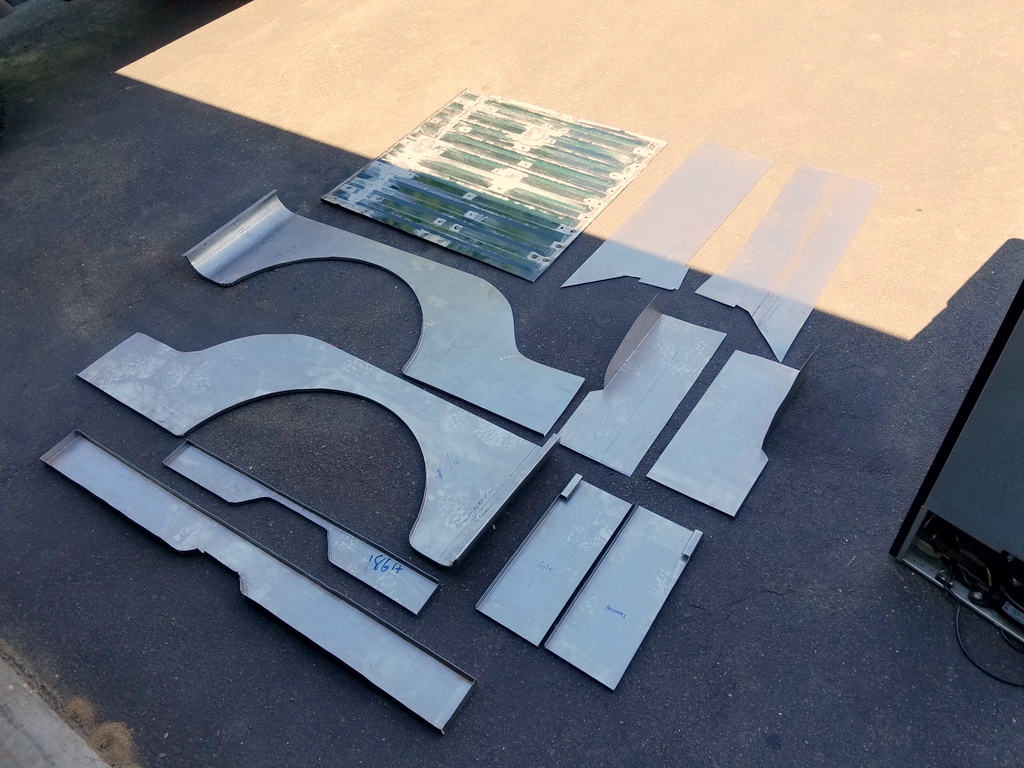
I decided to make all the panels at one time. I made tons of measurements of the original stuff, then made some drawings at 1:48 scale and printed them out so I could lay them out on a 4'x8' grid....to most efficiently cut out all the metal I'm going to need.
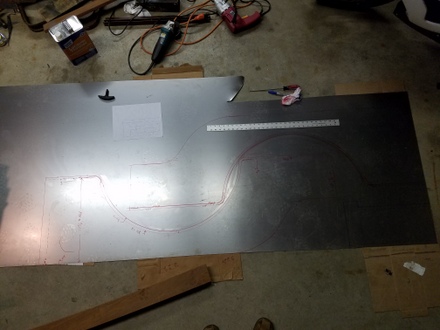
With the metal on the floor, I drew up all my panels and started cutting all the metal out. I bought a sheet metal shear from harbor freight to handle the many feet of cutting the 18 gauge metal. It was well worth it.
Most of these new panels need to have flanges and lips bent into them. And despite the thick 18 gauge stuff it can be done with wood forms, clamps, snips, and hammers. Soft wood will disintegrate when trying to hammer 18 gauge metal around an edge, but I have some scrap South American ironwood which is super hard, and forming edges works well.
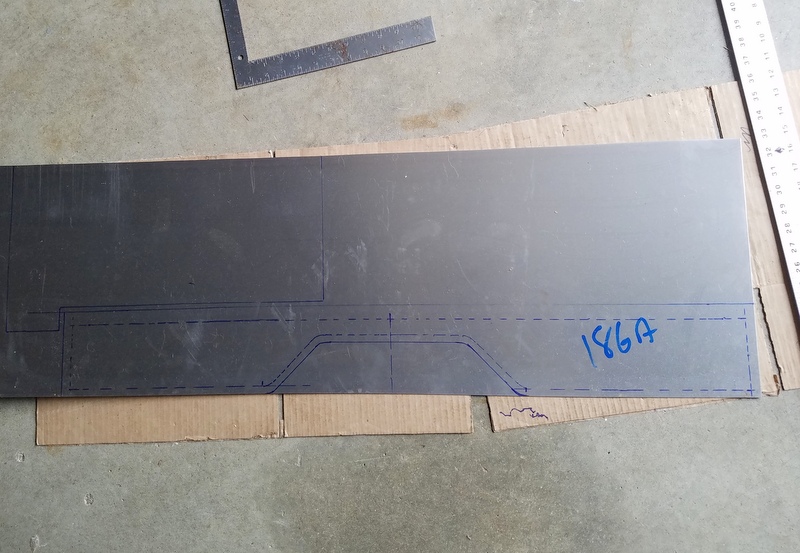
I started with the easy panels such as the rear valance piece. Note how I marked dashes for the 90 degree bends I need to form:
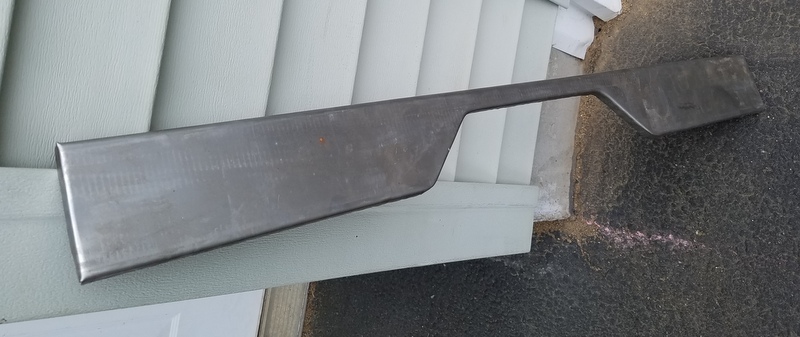
All the bends were made with simple straight boards and clamps except for the center "C" shape. I made C shape wood forms out of southern yellow pine and hammered that flange separately:

The finished panel:
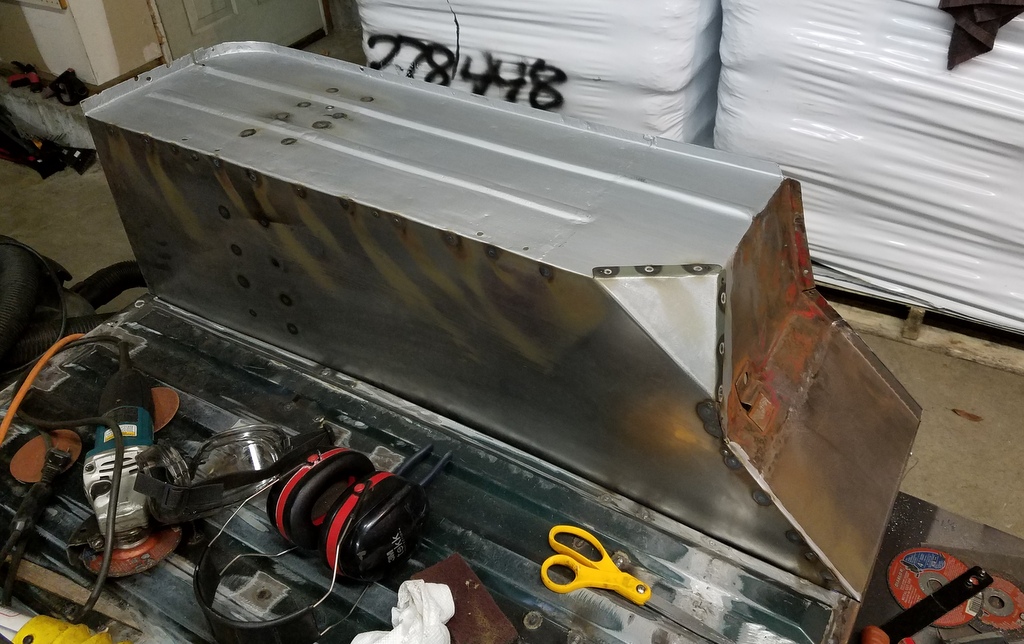
The side panels were more challenging. The most tricky part was the radiused surface back corners. I was going to bend them over a handmade form, but then I decided to try a small set of slip rolls I had access to. It was a bit awkward to do myself, but they came out great.
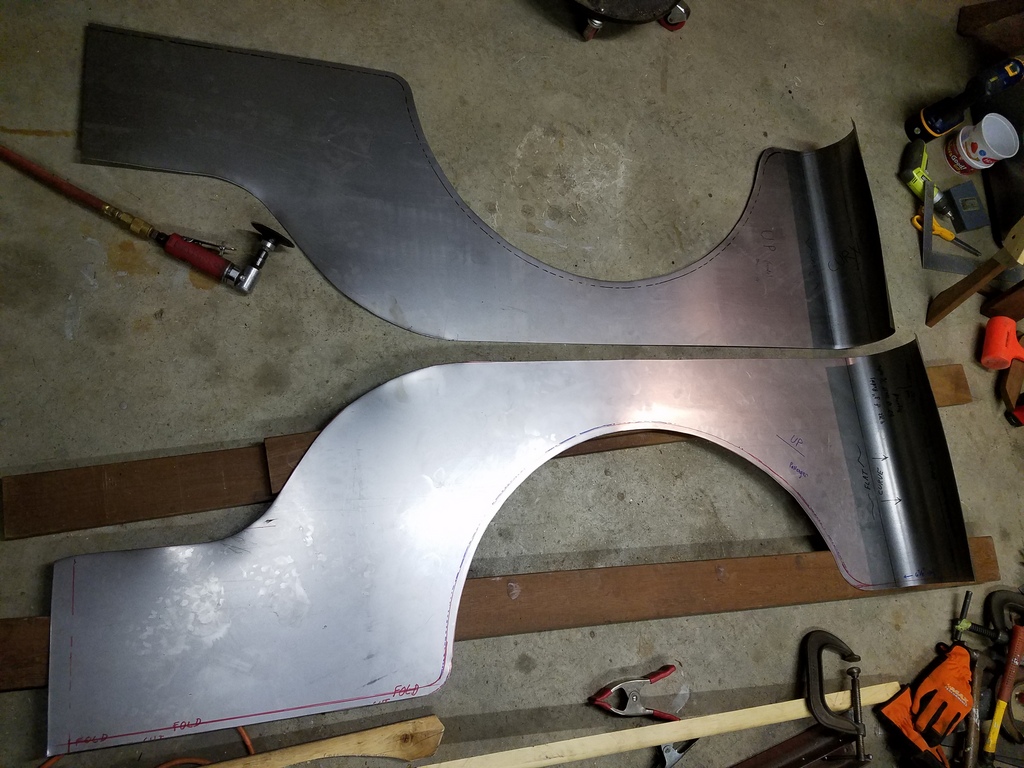
I was very careful to mark the beginning and end of where I wanted the curve to be. You can see the marker lines I made to indicate the start and finish of the curve area. I made a template to get the radius right too.
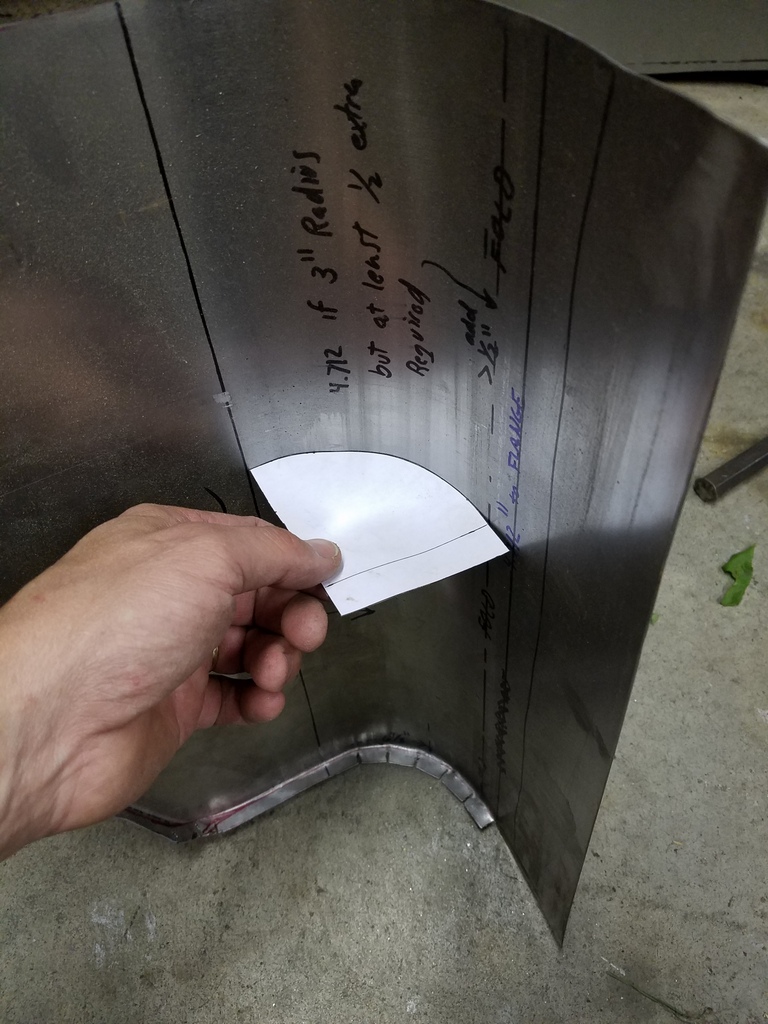
The bottom flange of the rear curve was made by folding the flange
over a hardwood male and
female form. I slit the flange-to-be to
avoid wrinkles when it gets folded over. The slits close up when
hammered over, and wouldn't weld up nice that way. I'll open the slits
up with a cutoff wheel which will make for a smooth, clean weld which
is easy to grind smooth.

For the huge wheel opening, I spliced three pieces of this ironwood together (with a couple softwood pieces to tie them together) and sandwiched it to one piece of plywood cut to the same wheel arch shape. I tapped the flange over the hardwood edge. For the tight radius corners, I again slit the metal to avoid wrinkles. I'll weld up the slits later and grind them smooth.

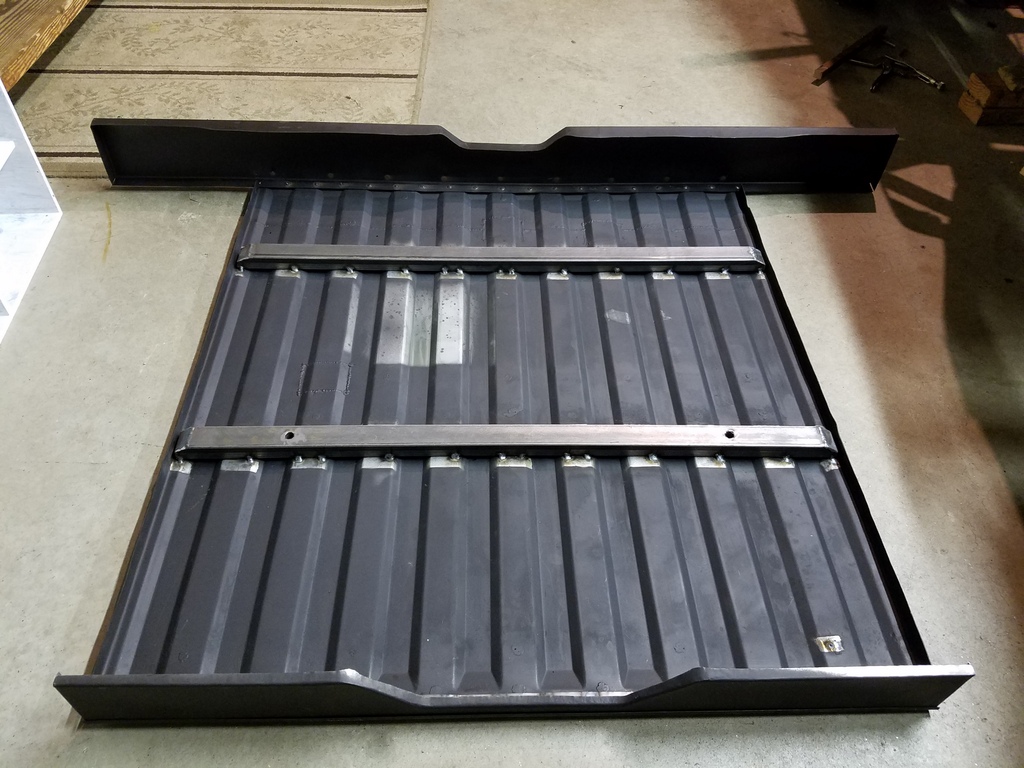
Rear Floor
I happened to be scrapping a 2000 Dakota with a decent bed floor, so I cut it out, sectioned it, then welded the two halves together to have the tapered corrugations on the forward and rearward ends of the floor. I also cut down the width and bent in flanges on each side. You can see the splice near the left edge in the picture, and you can also see I had to do small repairs from drilling out spot welds from it's old home on the Dakota. Lots of work, but it's definitely going to be a tough floor when installed.

The panels were fabricated over a couple weeks of part time work.
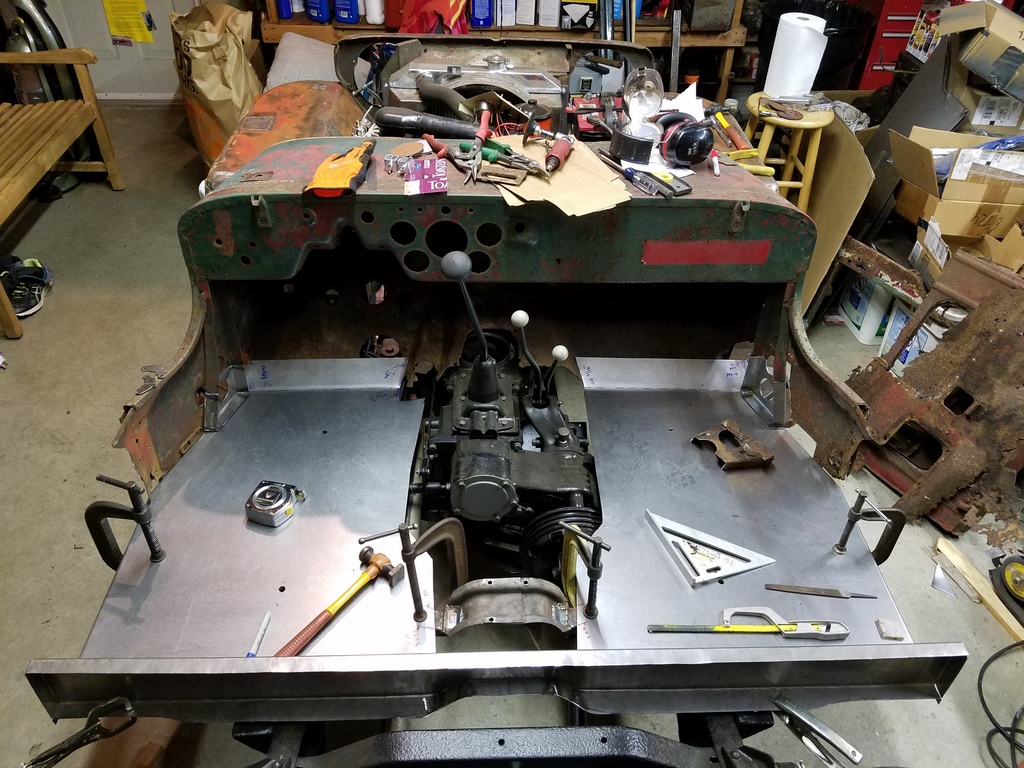
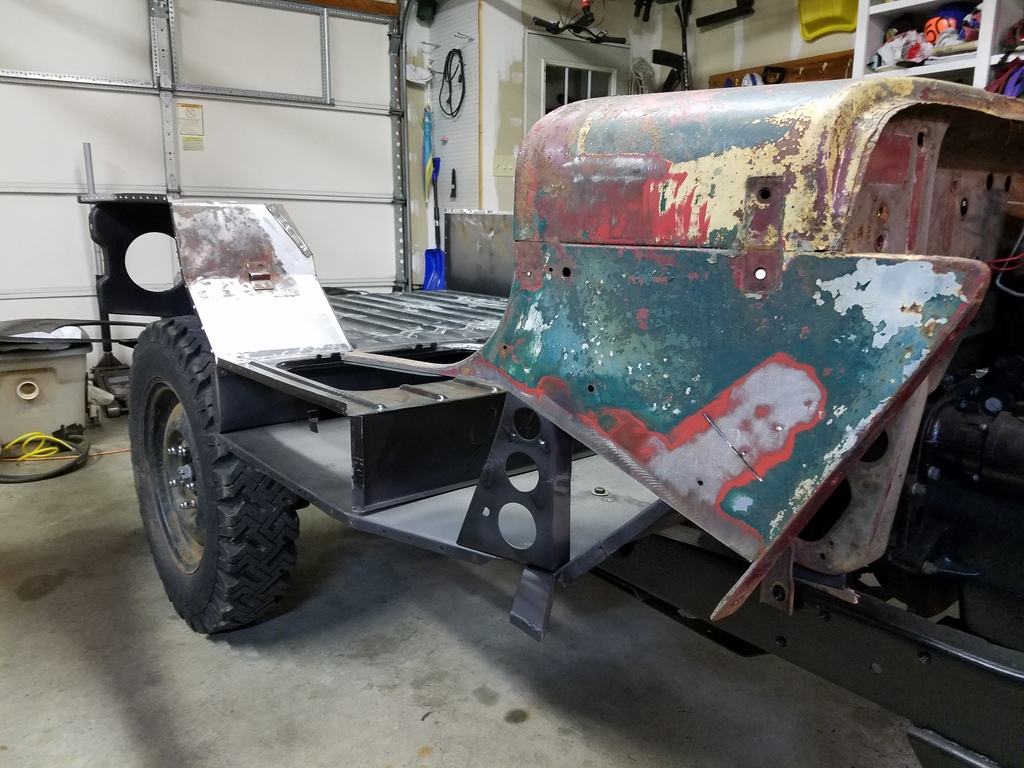
I couldn't help but mock up the tub with the parts I made:
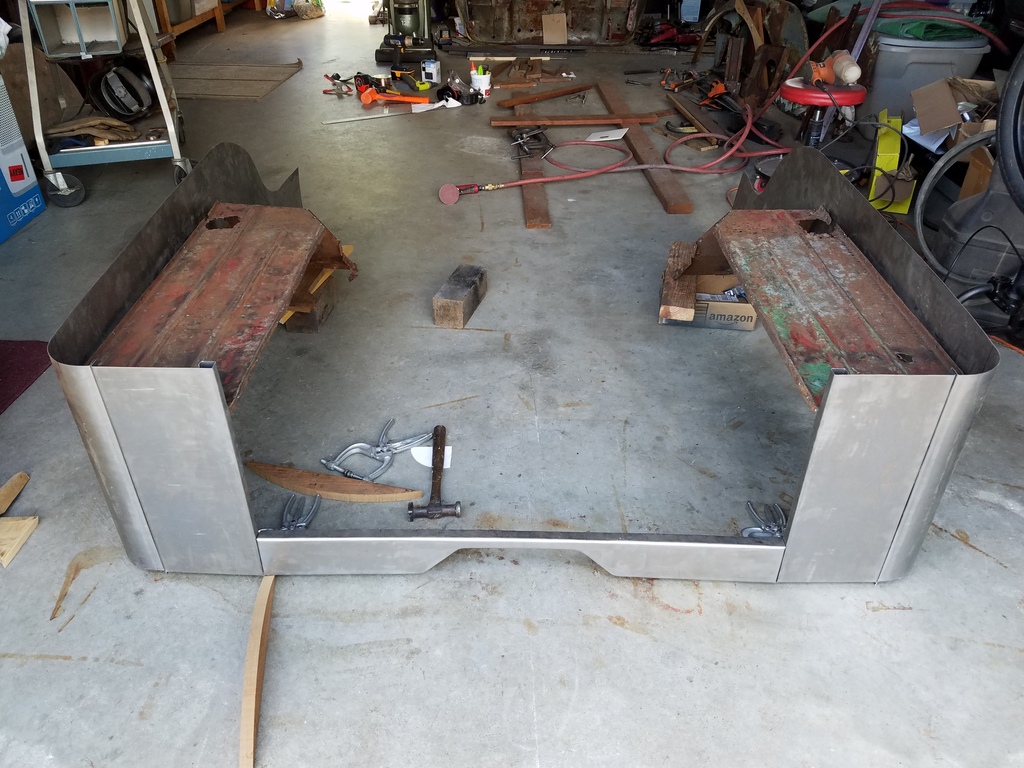
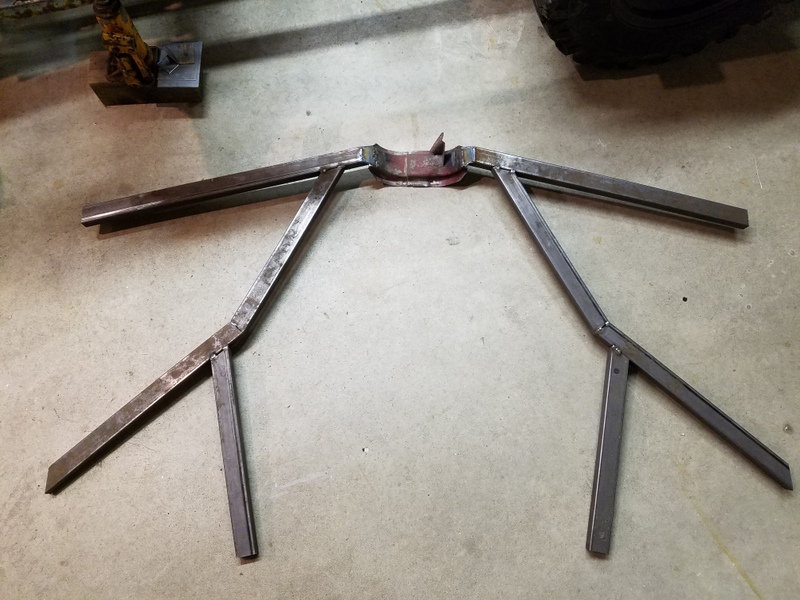
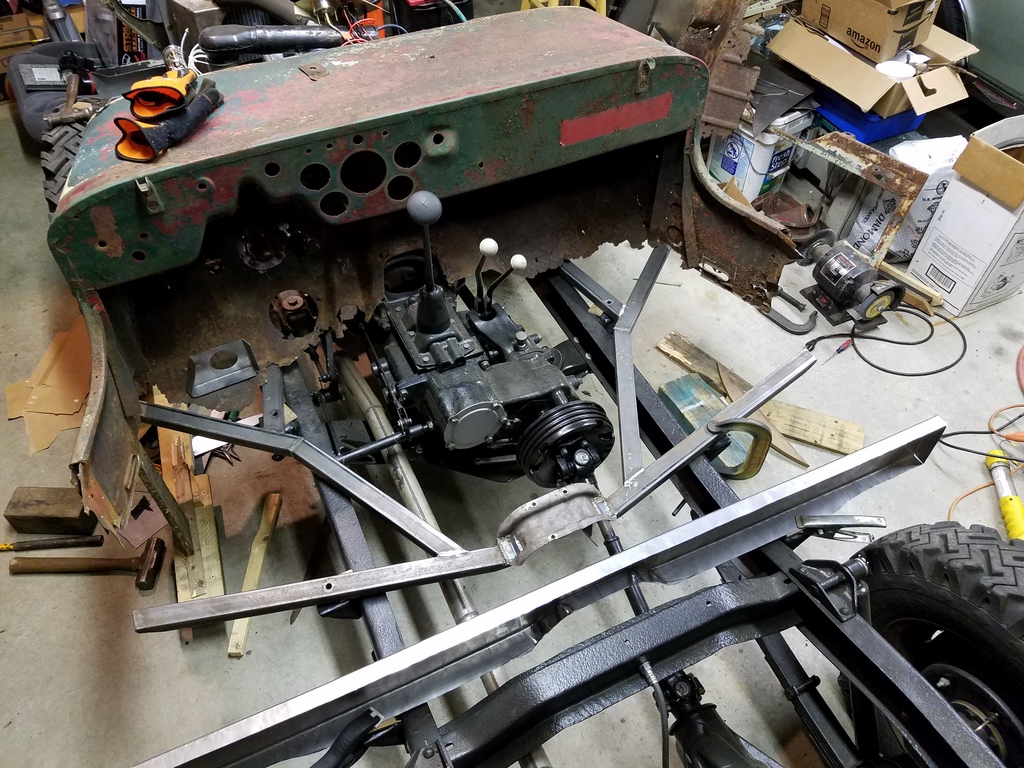
I flipped the front part of the tub upside down in order to measure and fabricate the front floors and "hat channels". The hat channels serve as braces for the floor pans, and the originals were mostly gone. There was just enough left to measure and duplicate them with rectangular steel tubing. Here the new pieces are overlayed to test their fit.

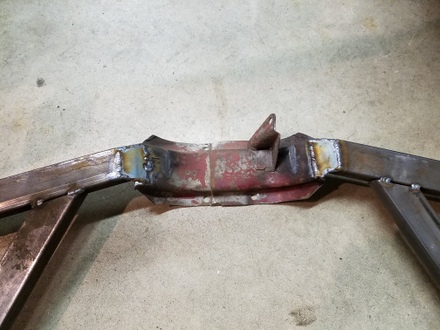
The "U" shape center section would have been hard to duplicate with my tools, and since it was in good condition, I grafted it to the new rectangular tubing.
Jeep sculpture.
To begin the tub re-assembly, the rotten floors were cut out of the tub, and then it was set down onto the replacement hat channels.
The tub was rather floppy as there wasn't much left to it. The first step was to graft in new cowl brace sections where they meet the floors. I used 16 gauge sheet steel for these.

The floor pans were next. I folded the flanges and made the toe board bends and started to test fit them to the Jeep.
The floor riser (vertical piece between the front and rear floors) was clamped onto the rear edges of the front floor pans. I had made a ton of measurements before I blew apart the tub so I referenced my notes and put the forward edge of the riser 39.75 inches from the back face of the rear crossmember.
I wanted to bolt the front fenders to the frame as a fit-check for the tub and fender relationship. The driver side hat channel had some rot so it needed some attention to strengthen it up.
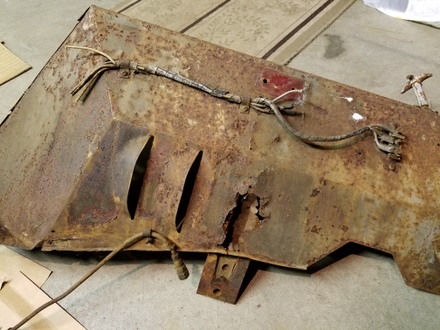
It was easiest to drill out the spotwelds and remove it for repairs. The rotted section was cut out and a section of rectangular tubing was grafted in to replace it. I welded strips onto the tubing to duplicate the flanges. The newly grafted tubing is on the left in the picture below.

A patch is being fitted to the fender while the hat channel is out.
The brace was bolted onto the frame and the fender set in place to test fit.
Everything was bolted in and the tub position was tweaked for good fit.

Rear Floor
Next up was to fit up the rear floor pan. I needed to assemble all the piece-parts into one subassembly. Rectangular tubing was substituted for the original style hat channels for the two cross braces and simply edge welded to the pan. The ends of the tubing were capped to seal them. The rear brace is 14.375 inches from the back edge of the rear floor and it gets drilled for body mount bolts.

Rear Wheel Housings
Despite the wheel housings being battered and rusted, I loved the textured "patina" (dings, dents....the "trophy marks") so I tried to save as much of them as I could.

I had hoped to keep the patches as small as possible and simply weld up most of the pinholes. It soon became apparent that I'd have to make larger patches including in the beaded areas. I dreaded making wood bucks for the beading, so I took a shot at bending up some sheet steel by hand in my bench vise. It looks like the original beads were done with worn out tooling by Willys anyway, so my work matched the original pretty well.
The sides needed to be fabricated all new. I pounded an original side flat and traced it onto new metal to re-create the shaved corners.
The braces were sand blasted, primed with Master Series, and then welded up to their respective wheel housings. The driver side is rather simple as shown below, but the passenger side is a large stamping which also supports the spare tire bracket.
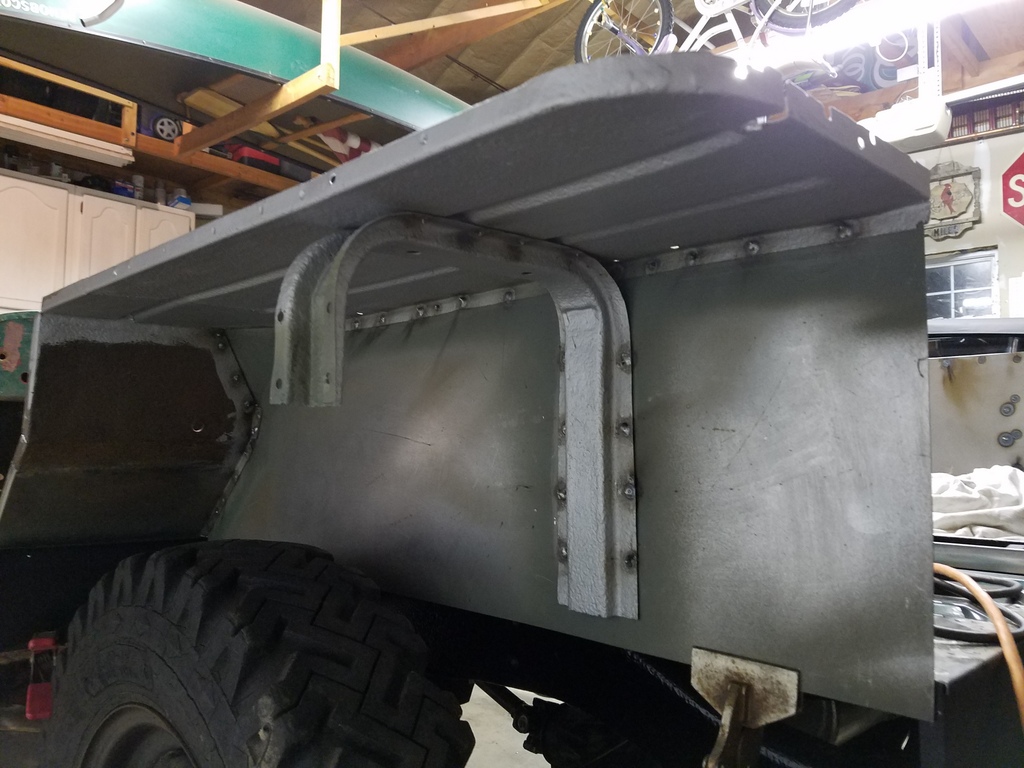
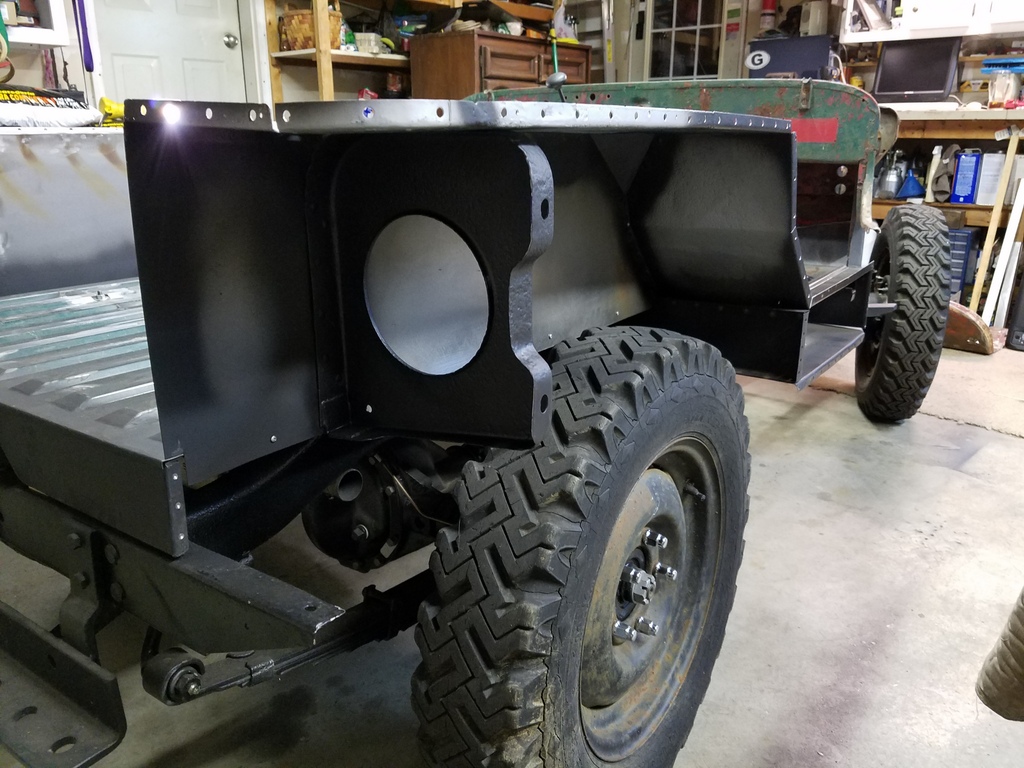
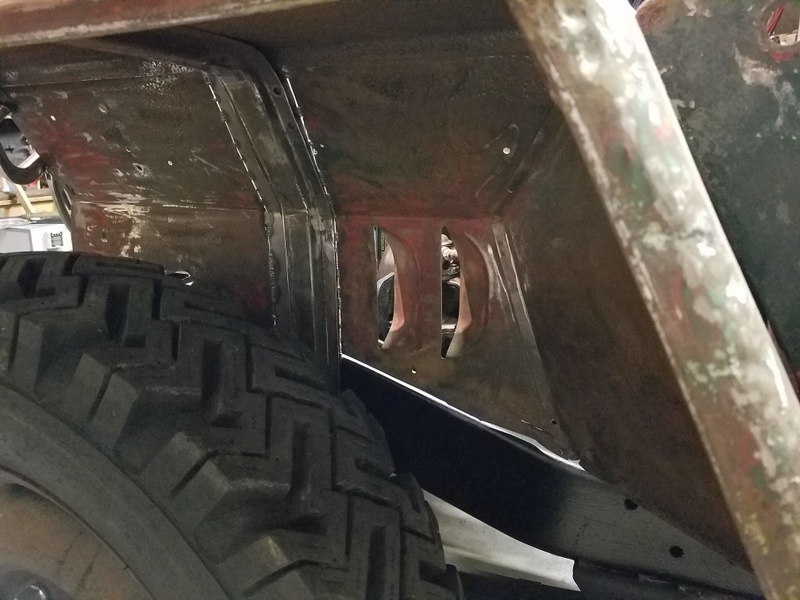
You can see here that I replaced the lower forward sections of the wheel housings where they meet up with the floor riser.
The assemblies were temporarily screwed onto the riser and rear floor pan. I used loads of sheet metal screws to put the tub together to test fit before I welded things together.

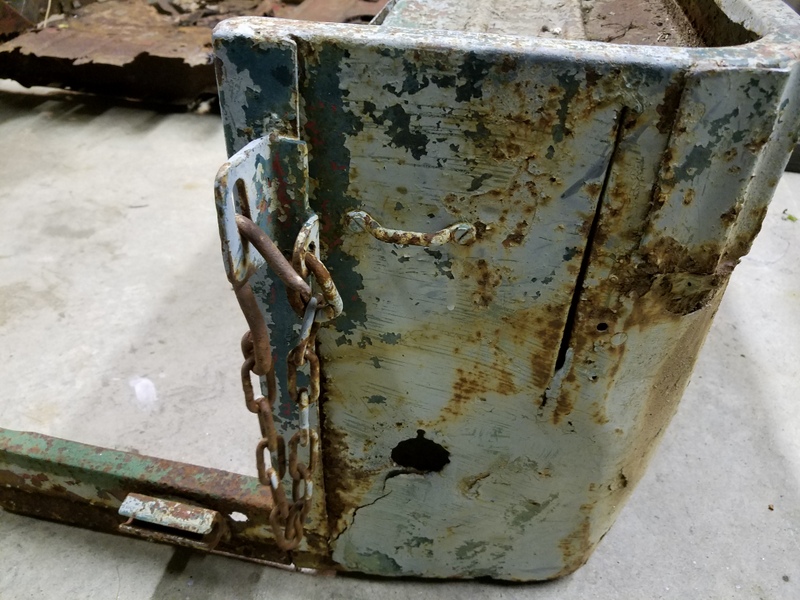
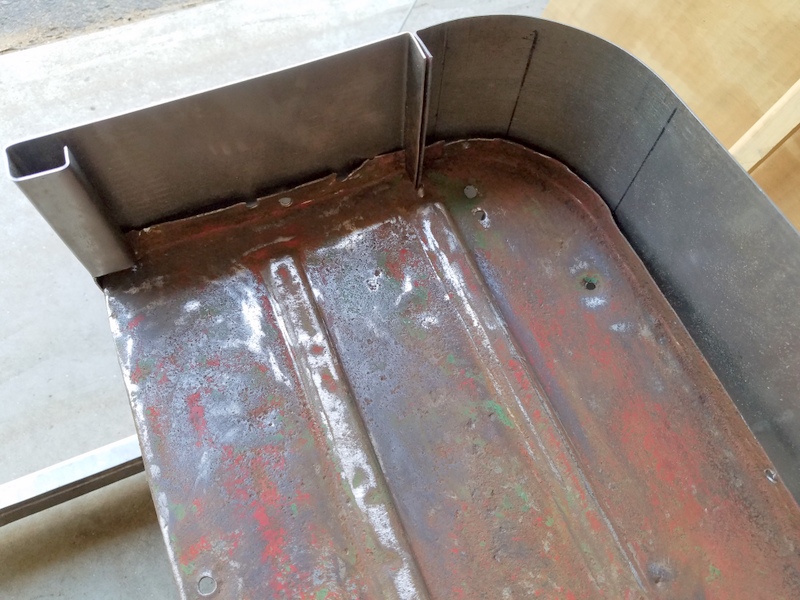
The Tool Box
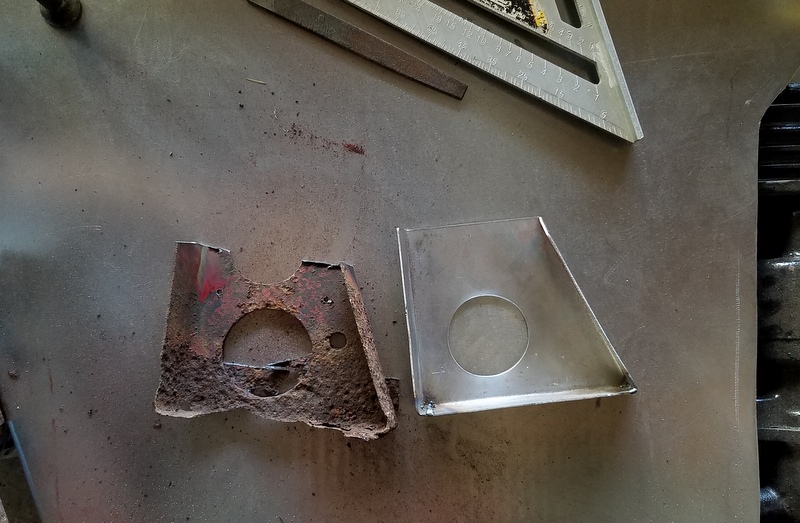
Universal Jeeps from 46 up until '71 or so had a "tool box" under the passenger seat. Pretty neat, but when built it seems like they hardly fogged any paint in there and usually rusted out as a consequence. Indeed, the tool box on my Jeep was mostly air, so I purchased a new tool box from OMIX ADA. The tool box as delivered is wrinkly and "off" in some details, so it needs some work before grafting it in.
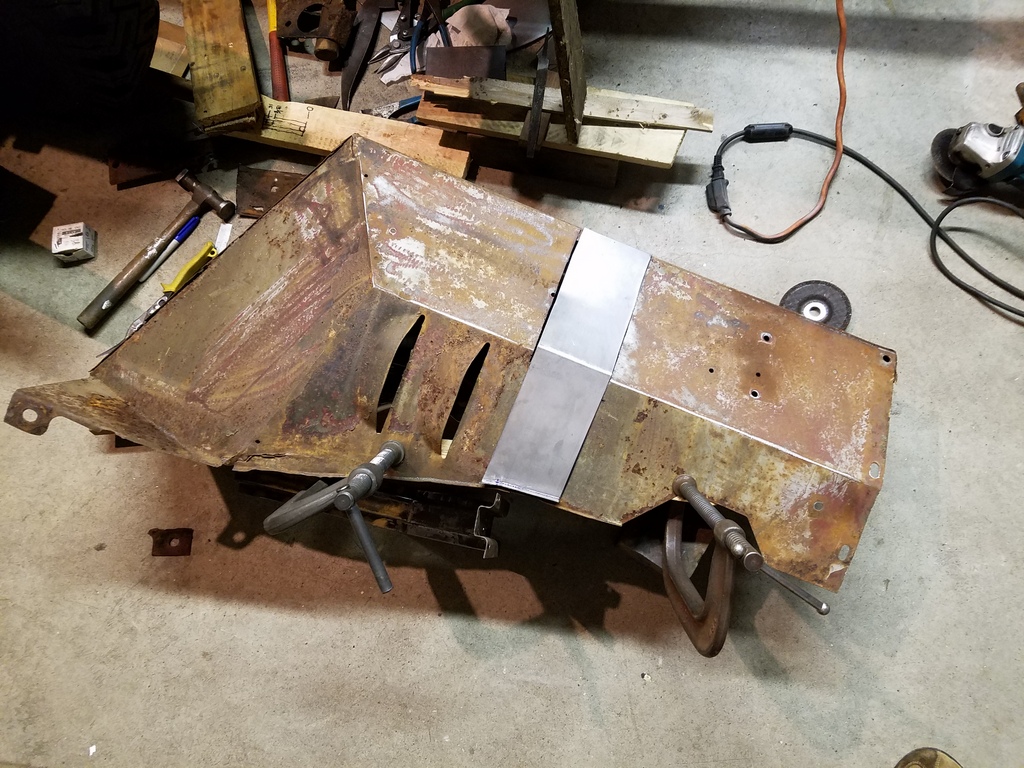
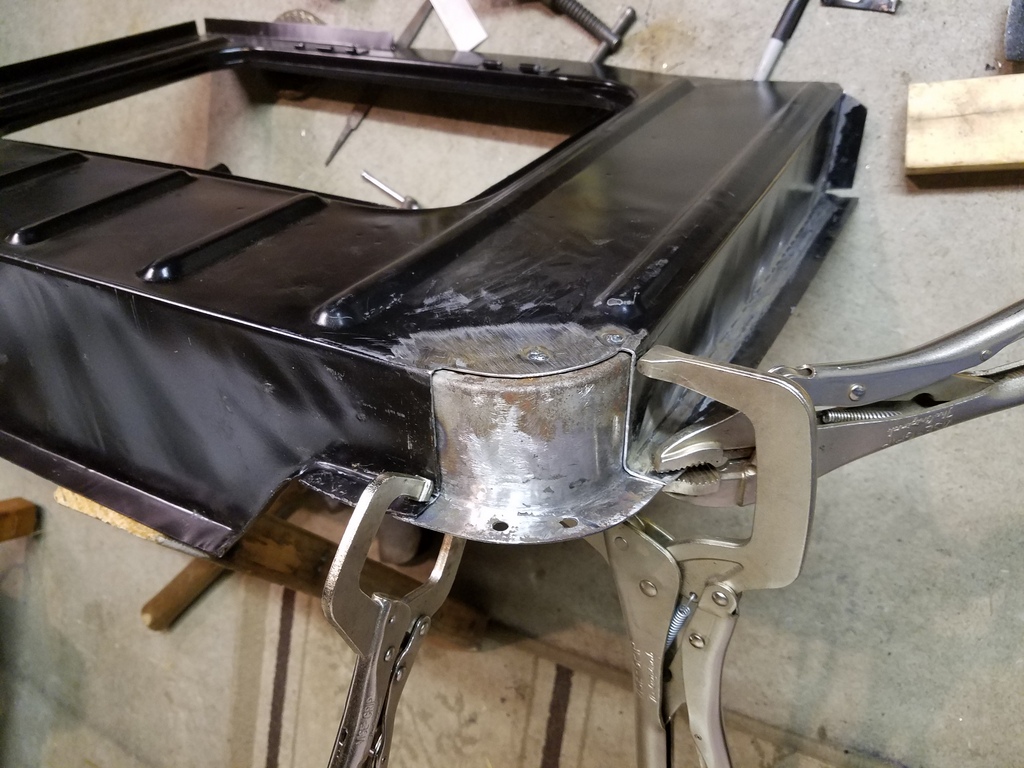
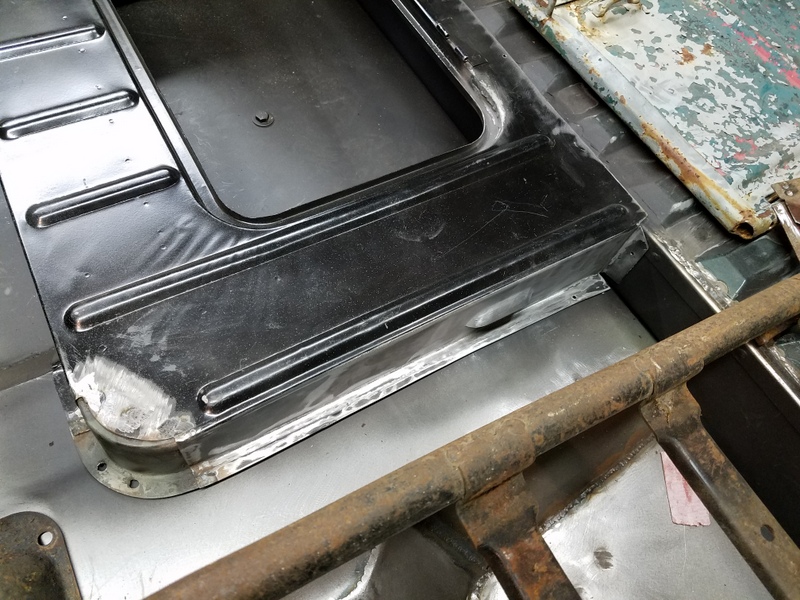
The most glaring problem is that the side that sits on the center hump is too tall. The flange needed to be flattened and refolded so that the height was about 3/8" shorter. The rear vertical flange also needed to be re-folded. The dashed line in the picture below indicates where I put the new fold.

The curved corner was also too tall, and besides that, the corner stamping was truly terrible. I drilled out the spot welds and removed the corner piece, then salvaged the original tool box corner and grafted it in. The lower piece is the orignal one that I'll use.
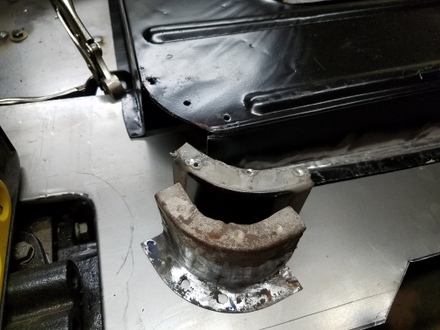
Note how much nicer it is, and it is also the correct height.
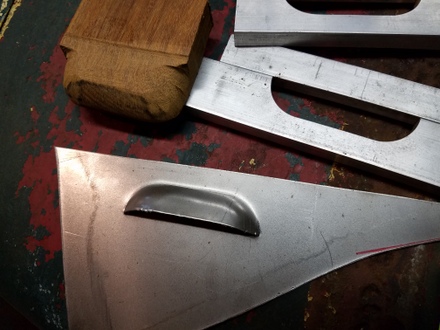
The new tool box was also missing the two ventilation louvers stamped in the front and side. I was going to ignore this, but at the last minute I made up a pair of aluminum forms in the shape of the louver. I also shaped a piece of hardwood (in picture below) to deform the metal into the shape of the louver inside the form. The picture below is my first test sample on some scrap steel.
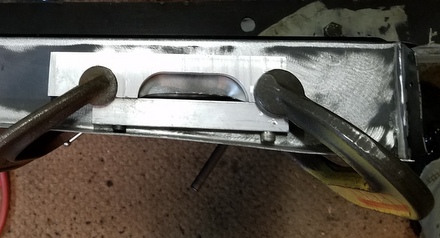
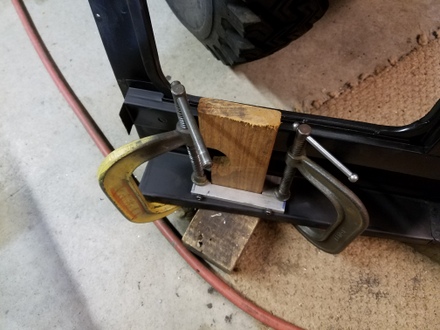
To start, a slit is cut in the tool box where the opening of the louver would be, then the long edge of the form plates are matched up on both sides of the slits and clamped in place. The wood form was then pounded into the form opening and the flap is deformed into shape. The result was really nice. I cleaned up the sharp edges and the louvers are done.
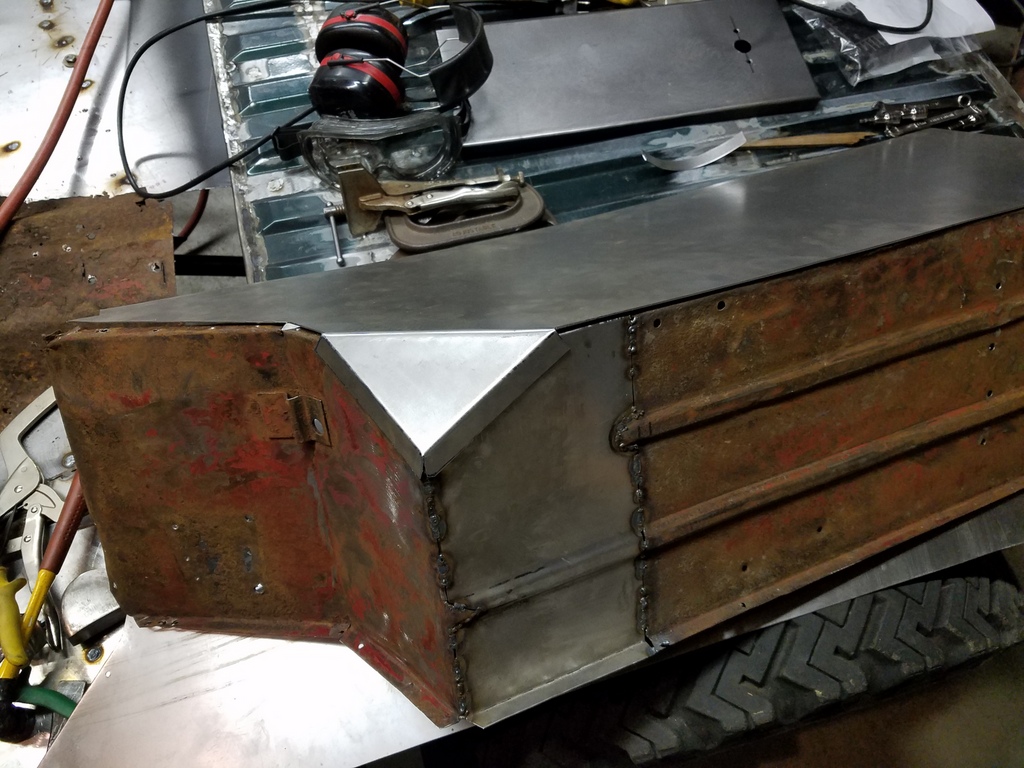
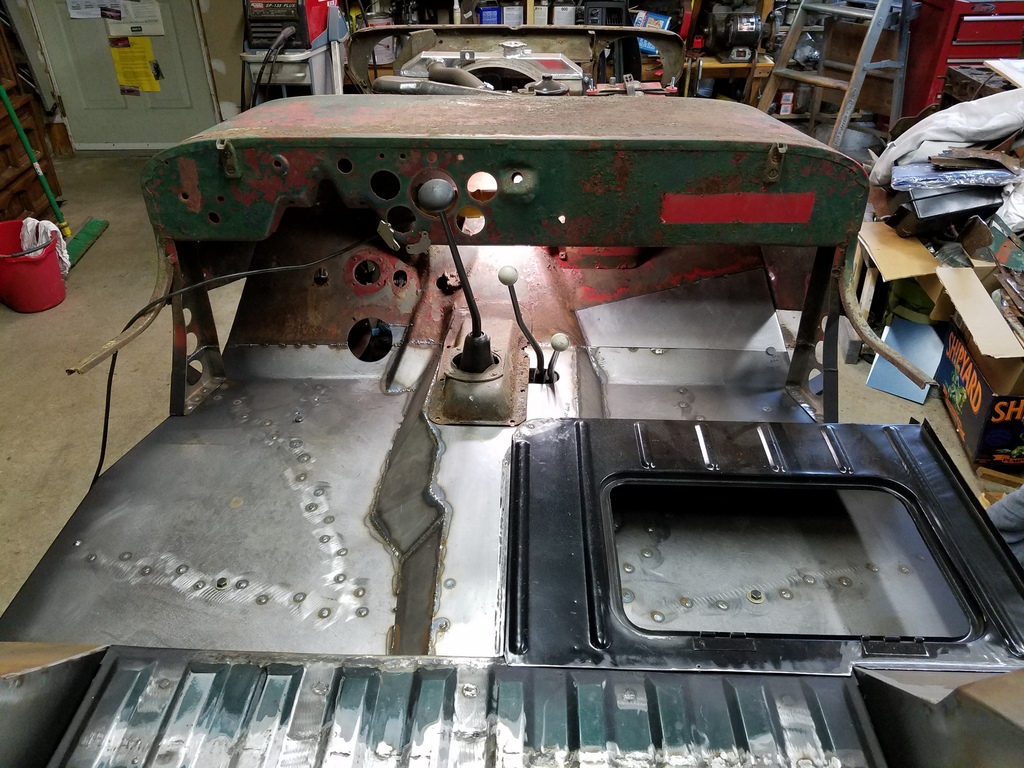
The "Hump"
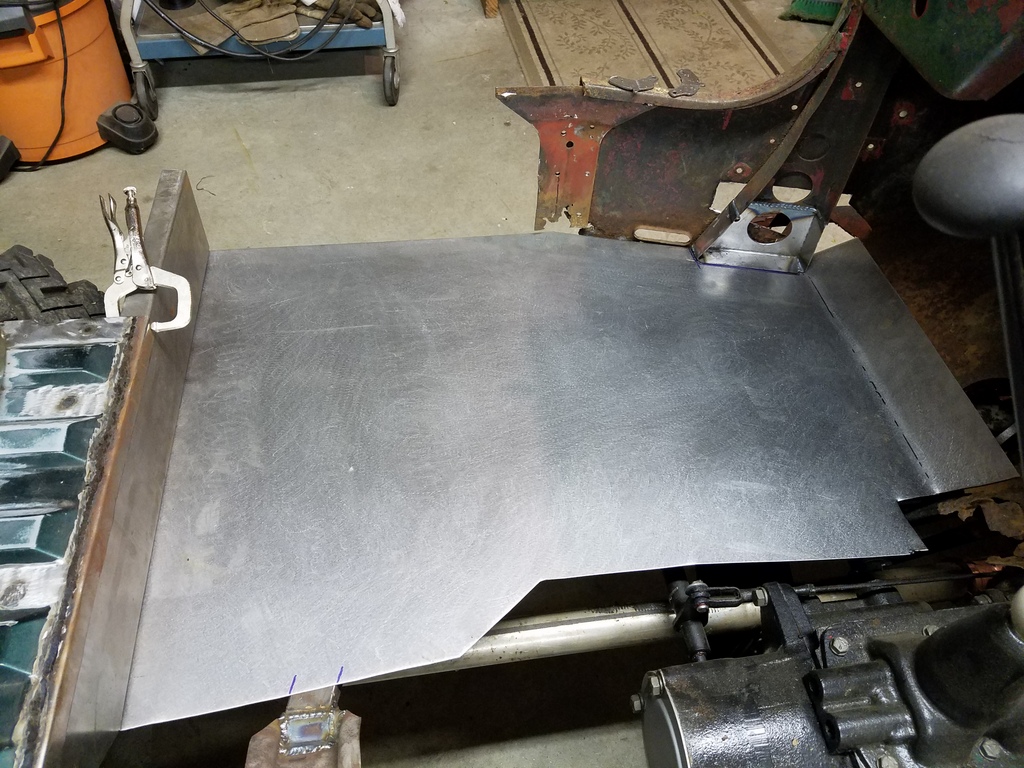
With tool box improvements done, it was time to fit it to the Jeep. The center hump had to be fabricated from scratch as there wasn't much of the original to measure against. I made the flat top first with the trans shifter openings and used cardboard to make templates for the hump sides.
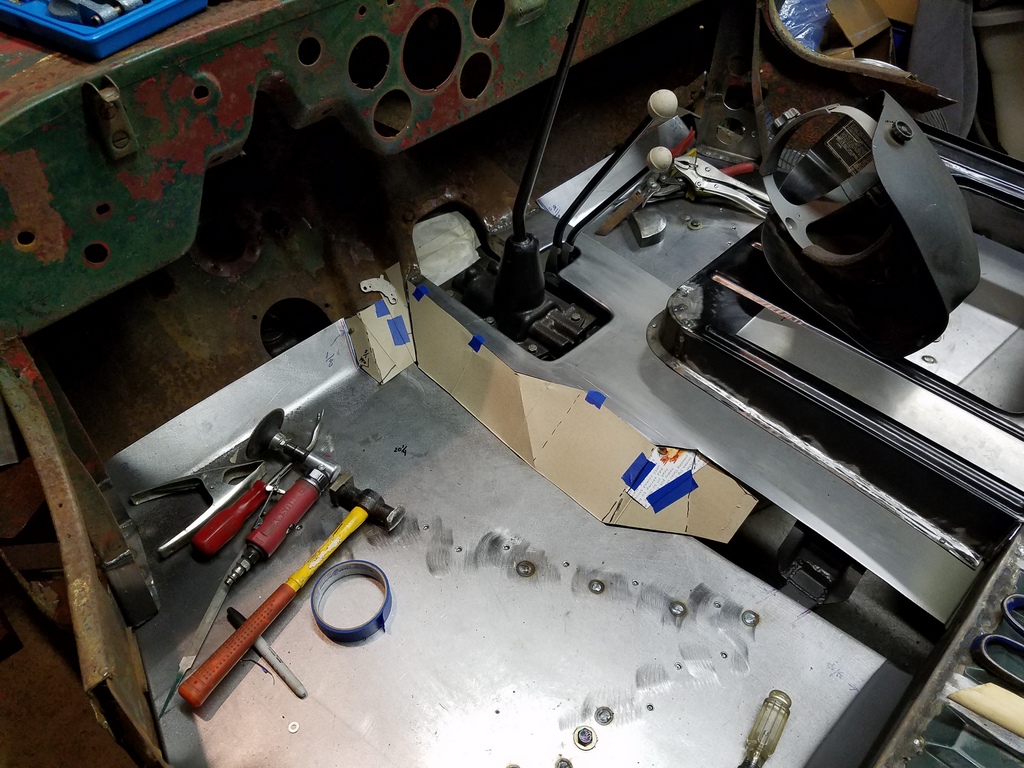
I basically built it up as I went and tacked in the pieces.
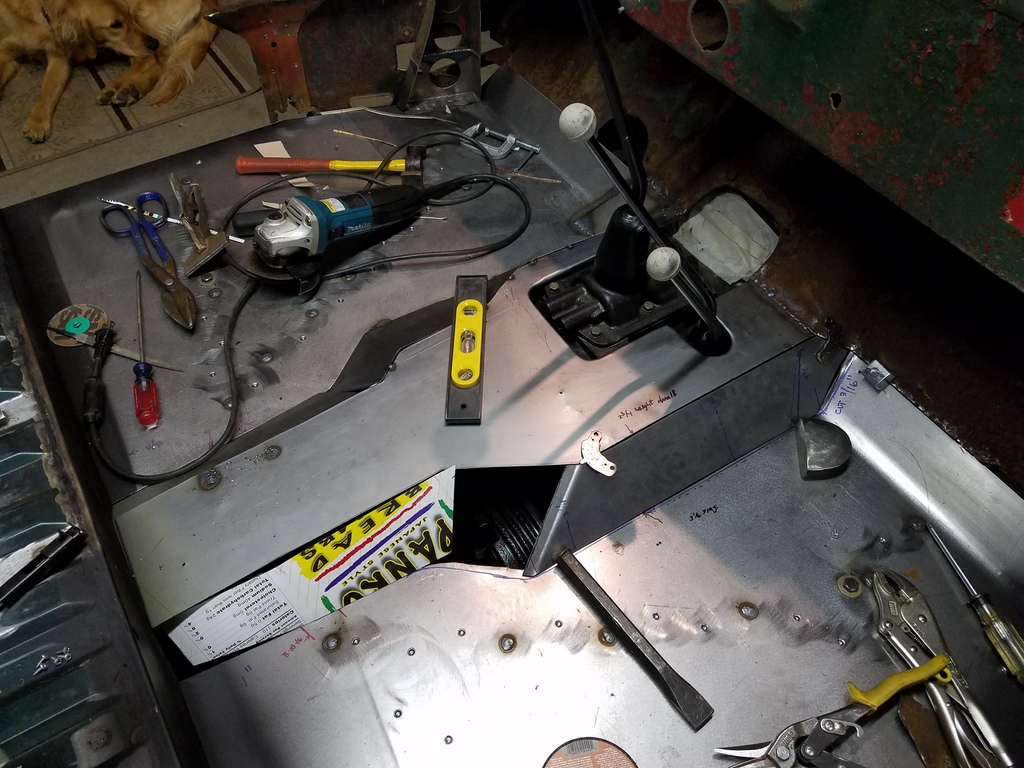

I made sure to trial fit the tool box and new gas tank as I went. Once I was satisfied, I welded it all up and did some preliminary grinding to pretty it up some.
I added a bit more new toe board to the passenger side. It's just tacked in at this point.
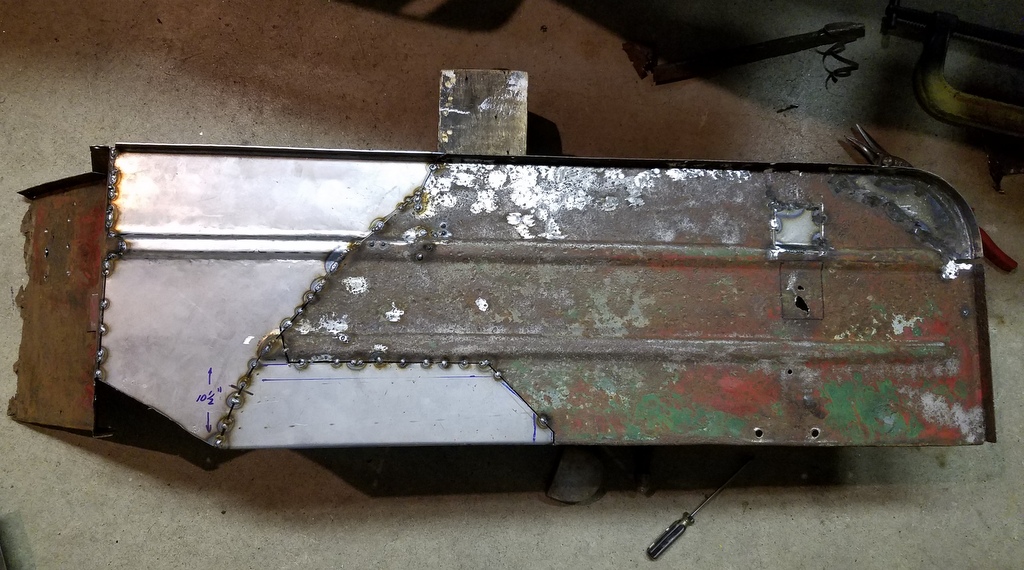
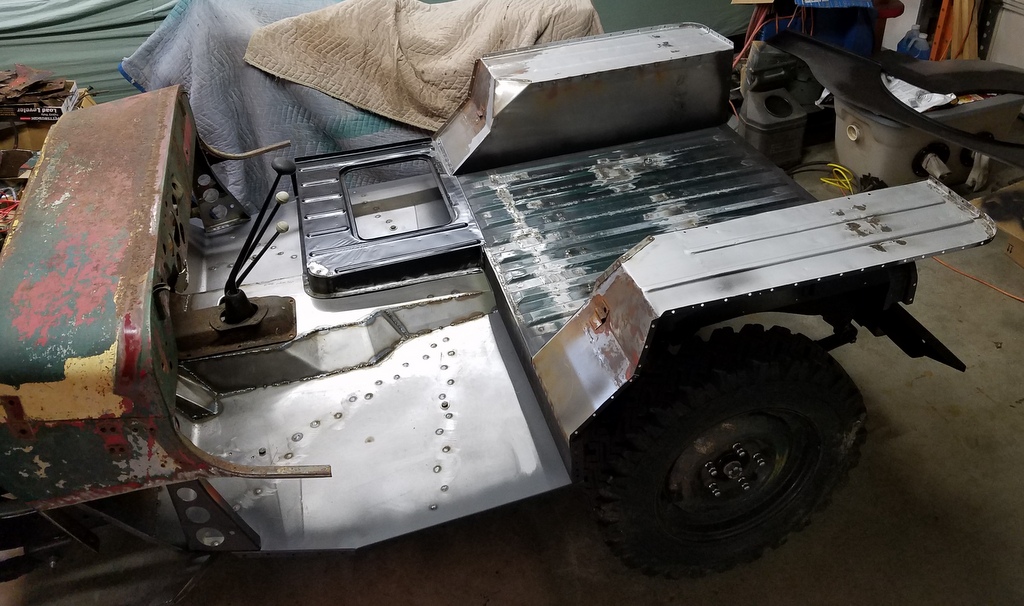
I finally trimmed all the rest of the rot off the original tub section. Note how I saved the curve of the forward part of the door opening. This flange has a reinforcement that I wanted to keep.
This was a pretty exciting milestone....all the rot was gone and new metal was taking shape. Next up: New tub sides! Go to CJ3A Tub Rebuild Part 2.
If you have ANY comments or questions, please drop me an email.
SFS
Links:
Willys Jeep CJ3A Forum
There exists a nice set of webpages for CJ3A's. It's got a forum too that caters to both '3A's and CJ3B's. It's a great resource, and frequented by very knowledgible folks.
1967 GTO Original Owner
These two videos feature an original owner GTO. This car was featured in Hemmings Muscle Cars magazine a couple years ago. Part 2 has inside and outside shots of the owner driving the car. Very nicely done.
Blues Maker
"Mississippi" Fred McDowell. One of the great Bluesman. This is a documentary made in 1969.
Pinstripes
Pinstriping the ol' fashioned way. Pretty nice.
MGB Racecar
I've always liked MG's. Watch this MGB lift it's inside tire a few inches off the tarmac when going "'round the bend". Awesome.
Pepsi Throwback

Pepsi has put out a "limited edition Throwback" version of Pepsi with REAL sugar, instead of high fructose corn syrup which has been used since the 80's. Holy cow there IS a difference; it's WAY better. Find some quick!